Getting Started with FleetNet
This chapter contains instructions for doing the following:
· Finding and retrieving specific records
Accessing FleetNet
1. Access FleetNet via the Internet at http://www.fleetnet.net. The User Login Window will appear.
Note: Some users experience difficulty trying to access FleetNet. If you are a FleetNet license or customer and this happens to you, access FleetNet at http://www.fleetnet.net/index_sjvm.html.
If Sun's JAVA Virtual Machine has not been loaded on your PC, this will download the appropriate VM software from the Sun web site. Then the FleetNet login process will continue.
2. User Name - Enter your User Name, as defined by your administrator (mandatory).
3. Password - Enter your password, as defined by your administrator (mandatory).
If you enter an incorrect password 10 consecutive times, your FleetNet account will immediately be deactivated. Contact your system administrator to reactivate the account.
Your FleetNet account will also be deactivated if you have not used it in the number of days specified by your Licensee (1-90 days).
4. Do one of the following:
·
Click the ![]() button.
button.
· Press [Enter].
· Press [Alt]+ L.
If you are a new user, you must change your password (see Changing Your Password).
Otherwise, you will be taken to your “home screen”:
· Customer Detail tab of the Customer screen, if you have access to just one customer.
· Customer List tab of the Customer screen, if you have access to more than one customer.
Changing Your Password
1. After entering your User Name and Password, the Change Password screen will appear.
2. Old Password - Enter your existing password.
3. New Password - Enter a new password. Previously used passwords cannot be reused.
The password must contain at least six characters, and a maximum of 10. The password must contain at least one numeral (0-9).
4. The password must not contain special characters such as the following: ! & _ % ? $
5. The password must not contain the User Name or any spaces.
6. Re-Enter New Password - Re-enter the new password for verification.
7. Click
the ![]() button (or press [Alt]+O) to accept the new
password. A confirmation window will appear, and you will be navigated to your
home screen. You will also receive a confirmation email.
button (or press [Alt]+O) to accept the new
password. A confirmation window will appear, and you will be navigated to your
home screen. You will also receive a confirmation email.
To change your
password at any time, click the ![]() button (or press [Alt]+C) in the User Login
Window. Then follow the steps listed above.
button (or press [Alt]+C) in the User Login
Window. Then follow the steps listed above.
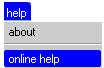
Using Online Help
Access online help by selecting Help -> Online help from the drop-down menu:
Navigation
FleetNet consists of screens covering the topic areas (sites, customers, employees, etc.):
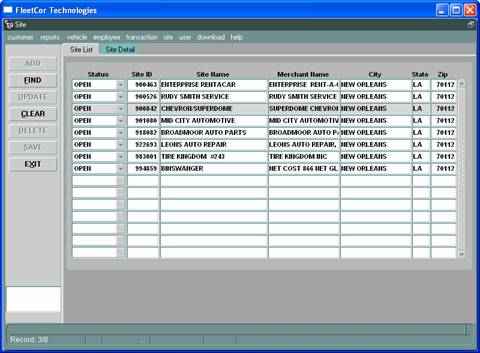
As shown in the Site screen, screens consist of the following:
· A menu bar at the top.
You can use the drop-down menus to navigate in FleetNet. For example, to leave the Site screen and find an employee, select Employee -> Find from the drop-down menu:
![]()
Many of the drop-down options are “grayed out” until you arrive at a relevant screen. Also, options are grayed out if you do not have permissions for those functions.
· One or more tabs. On the tabs you can view or enter information, depending on your security permissions.
The Site List tab is visible in the screen shot above. On that tab you can search for one or more sites (see Finding and Retrieving Specific Records). To view details for a site, either double-click on the site or highlight it (place your cursor on its row) and click on the Site Detail tab (to the right of the Site List tab).
Each chapter in this guide explains all of the tabs for the applicable screen.
· Command buttons on the left side.
Command buttons vary depending on the screen, your permissions, and the task you are performing at the time. For example, the Add button would be grayed out on the Site screen if you do not have permission to add sites.
If a command button contains an underlined letter, it
can be used by pressing hotkeys. For example, to find a site, you can click the
![]() button or you
can press [Alt] and F at the same time.
button or you
can press [Alt] and F at the same time.
· Message bars on the bottom left.
These bars provide information such as tips on how to use the screen (“Click Find to perform a search or Exit to Logout” is shown above), the results of a search (if no records are found, a message would appear here), and the record number in a list (“1” in the example above).
Finding and Retrieving Specific Records
When you arrive at a List tab, you must search for the record or records that you wish to view or work with. For performance reasons, FleetNet does not automatically display a list of all sites, for example.
1. On
the left side of the screen, click the ![]() button (or press [Alt]+F). Then enter search
criteria into the available fields. If a field is unavailable for searching,
you cannot type in it. Use one of the other fields.
button (or press [Alt]+F). Then enter search
criteria into the available fields. If a field is unavailable for searching,
you cannot type in it. Use one of the other fields.
To return all records with Zip Codes (for example) that start with “700”, enter “700” in the Zip field of the Site screen.
In most fields you can use a % (percent sign) wildcard in a search. For example, to return all records with Site Names that contain the word “Chevron”, enter “%Chevron” in the Site Name field of the Site screen.
2. Click
the ![]() button (the FIND button becomes the RETRIEVE
button after it is clicked). Corresponding records will be displayed.
button (the FIND button becomes the RETRIEVE
button after it is clicked). Corresponding records will be displayed.
If no records are returned from your search, a message will appear in the message bar (in the lower left corner of the screen). Then you should try the following:
· Ensure that you are working with the desired customer.
·
Check that you did not make any typing errors in
your search. For example, you might have meant “
3.
In addition to viewing the summary information
on the List tab, you can view details of a
record or update the record if you have
authority to do so.
Cancel the search at
any time by clicking the ![]() button (the EXIT
button becomes the CANCEL button after FIND is pressed). This will display a
blank List tab. You can press Find again and try another search, or use the
menu bar to navigate to another screen.
button (the EXIT
button becomes the CANCEL button after FIND is pressed). This will display a
blank List tab. You can press Find again and try another search, or use the
menu bar to navigate to another screen.
Viewing Details of a Record
To view details of a site, for example, do the following. (If you have already retrieved the desired record, skip to step 3.)
1. Navigate to the Site List tab via the menu bar (Site -> Find).
2. Find a site or group of sites (see Finding and Retrieving Specific Records). Summary information will appear on the List tab.
3. Either double-click on the desired site, or highlight it and select the Detail tab (to the right of the List tab). The Site Detail tab will appear:
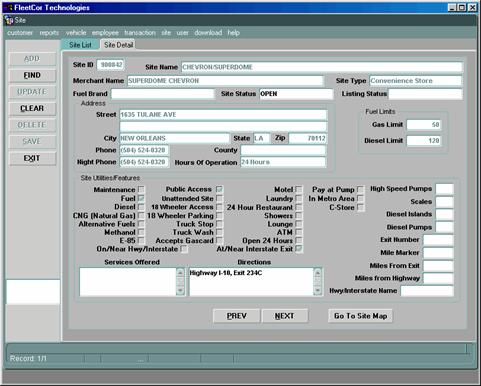
Note: As
described in the Site chapter, this tab has fewer fields when viewed by Private
Label customers.
The Detail tabs contain ![]() (Previous) and
(Previous) and ![]() buttons. If your search
returned a group of records, you can use these buttons to scroll through the
records as presented on the List tab. The message bar in the lower left of the
screen indicates where you are in the list.
buttons. If your search
returned a group of records, you can use these buttons to scroll through the
records as presented on the List tab. The message bar in the lower left of the
screen indicates where you are in the list.
Using the Site screen as an example, you are viewing record
1. Therefore, clicking the ![]() button would not
display a different record. But clicking the
button would not
display a different record. But clicking the ![]() button would display
the details for the next site in the list.
button would display
the details for the next site in the list.
This feature is especially helpful if you are working with a group of records (see Updating Records).
Data Entry
Authorized users can change or add records in FleetNet. General instructions are provided here to get you started. In addition, each chapter in this guide provides tips for updating or adding the applicable records.
The List Box, frequently used in updating and adding records, is also discussed in this section.
Updating Records
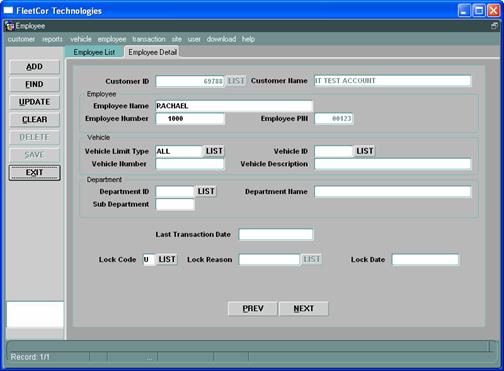
Follow these general instructions (the Employee screen is used as an example):
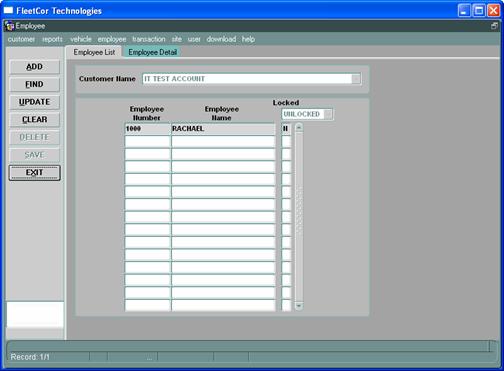
1. Navigate to the Employee List tab via the menu bar (Employee -> Find; or Customer -> View Employees).
2. Find an employee or group of employees (see Finding and Retrieving Specific Records). Summary information will appear on the Employee List tab:
3.
Highlight the desired employee and click the ![]() button (or press
[Alt]+U). The Employee Detail tab will appear, unprotected (so you can make
changes):
button (or press
[Alt]+U). The Employee Detail tab will appear, unprotected (so you can make
changes):
Note: As described in the Employee chapter,
this tab has slightly different fields when viewed by Private Label customers.
4. Make the allowable changes, as described in the Employee chapter.
5.
Click the ![]() button (or press
[Alt]+S). You will be asked to confirm:
button (or press
[Alt]+S). You will be asked to confirm:
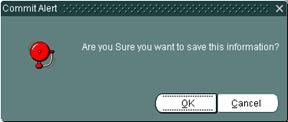
To save the changes, click the OK button (or press [Alt]+O).
You can cancel
the changes by clicking the ![]() button (or pressing [Alt]+C) any time before
pressing OK.
button (or pressing [Alt]+C) any time before
pressing OK.
Adding Records
Follow these general instructions (the Employee screen, shown above, is used as an example):
1. Navigate to a blank Employee Detail tab in one of the following ways:
· Select Employee -> Add from the menu bar.
·
Click the ![]() button on the Employee
screen.
button on the Employee
screen.
· Press [Alt]+A on the Employee screen.
2. Complete the fields as indicated in the Employee chapter.
Click the ![]() button (or press
[Alt]+S). You will be asked to confirm. To add the new employee, click the OK
button (or press [Alt]+O).
button (or press
[Alt]+S). You will be asked to confirm. To add the new employee, click the OK
button (or press [Alt]+O).
You can cancel
the save by clicking the ![]() button (or pressing [Alt]+C) any time before
pressing OK.
button (or pressing [Alt]+C) any time before
pressing OK.
Using List Boxes in Data Entry
When you are updating or adding a record, many fields provide list boxes from which you can select the correct value. For example, in the Employee Detail screen shown above, the Vehicle Limit Type field (among others) provides a list box.
When you see the ![]() button next to a field you have two options:
button next to a field you have two options:
· If you know the appropriate value, you can type it in the tab. If the value is not recognized, a List box will pop up to help you select the correct value.
· If you don’t know what to enter, click the LIST button to select from a list of options.
Either way, the list may contain:
· Values corresponding to the selected customer (for example, all vehicle classes associated with the selected customer), or
· A blank box with search options, or
· Set options:
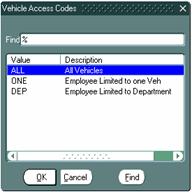
Find the desired value by scrolling through the list
or using the Find button. (Click the cursor on the Find field. Enter all or
part of the value and click the ![]() button (or
press [Alt]+F). Corresponding record(s) will be displayed.)
button (or
press [Alt]+F). Corresponding record(s) will be displayed.)
When you find the value, do one of the following:
· Double-click on the value.
·
Select the value, and click the ![]() button.
button.
· Select the value, and press [Alt]+O.
The value (and often related values) will populate on the data entry tab.