Customer Options
The Customer Options screen provides a mechanism for licensees to customize billing, reports, and other information for this customer.
The screen consists of two tabs:
· Customer Option Classes displays the available groups of customer options, and allows you to choose an option class to work with.
· Customer Options Details displays information about customer options in a selected class. If you are authorized to do so, you can add or change information on this tab.
To access the Customer Options screen, first select a customer on the full-mode Customer screen. Then do one of the following:
· From the full-mode Customer, Customer Tax Exemptions, Miscellaneous Charges, or Fuel Product Prices screens, select Customer -> Customer Options from the drop-down menu:
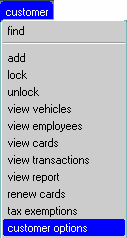
· On the Customer list tab of the full-mode Customer screen, highlight the customer and select “CUSTOMER OPTIONS” on the action list:
Customer Option Classes
This tab displays summary customer option information for the selected customer:
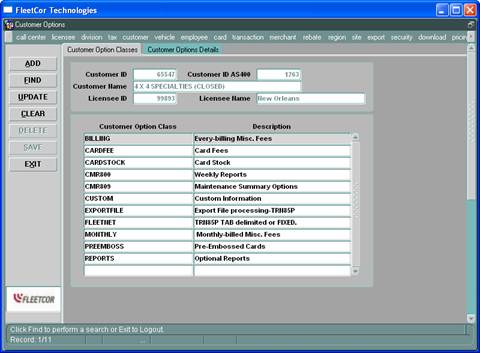
The tab’s data fields are as follows:
|
DATA FIELD |
DESCRIPTION |
|
Customer ID |
Unique system-assigned identifier of the customer (populated). |
|
Customer ID AS400 |
Customer’s number on the AS/400 (populated). |
|
Customer Name |
Customer’s name (populated). |
|
Licensee ID |
Licensee to which the customer belongs (populated). |
|
Licensee Name |
Name of the licensee to which the customer belongs (populated). |
|
DATA FIELD |
DESCRIPTION |
|
Customer Option Class |
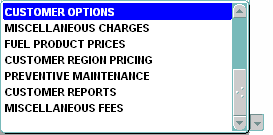
Type of customer option: · BILLING · CARDFEE · CMR809 (Maintenance Summary) · CUSTOM · FLEETNET · MONTHLY ·
REPORTS |
|
Description |
Description of the Customer
Option Class. |
The tab’s command button functions are as follows:
|
BUTTON |
DESCRIPTION |
|
Add ([Alt]+A) |
Allows authorized users to add customer options. |
|
Find ([Alt]+F) |
Allows you to search for an option class. See the Getting Started chapter for tips. |
|
Update ([Alt]+U) |
Allows authorized users to update options for this customer. |
|
Clear ([Alt]+C) |
Clears the data fields, but
does not unlock the form. |
|
Delete ([Alt]+D) |
Not in use at this time. |
|
Save ([Alt]+S) |
Saves changes made. You will be asked to confirm the changes. |
|
Exit ([Alt]+X) |
Exits the application. |
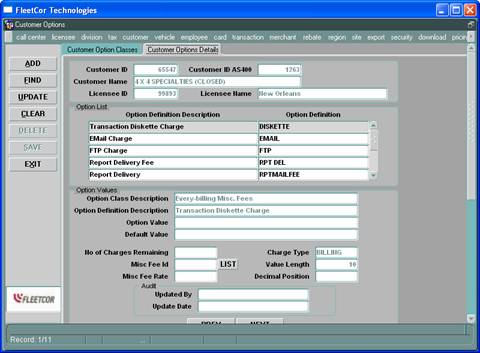
Customer Options Details
This tab displays more information about the selected customer option:
To view another option, click the ![]() or
or ![]() button (or press
[Alt]+P or [Alt]+N, respectively). (See the Getting
Started chapter for help).
button (or press
[Alt]+P or [Alt]+N, respectively). (See the Getting
Started chapter for help).
The tab’s data fields tab are as follows:
|
DATA FIELD |
DESCRIPTION |
|
Customer ID |
Unique system-assigned identifier of the customer (populated). |
|
Customer ID AS400 |
Customer’s number on the AS/400 (populated). |
|
Customer Name |
Customer’s name (populated). |
|
Licensee ID |
Licensee to which the customer belongs (populated). |
|
Licensee Name |
Name of the licensee to which the customer belongs (populated). |
|
Option List DATA FIELD |
DESCRIPTION |
|
Option Definition Description |
Description of the Option Definition. For example, a description of DELIVERY is “Report Delivery Method (MAIL/FAX/HAND/WEB)”. |
|
Option Definition |
Specific field being customized.
For example, an Option Definition for the REPORTS Customer Option Class is
DELIVERY. |
|
Option Values DATA FIELD |
DESCRIPTION |
|
Option Class Description |
Description of the option class to which this Option Definition belongs (populated when you select a Customer Option Class on the Customer Option Classes tab). |
|
Option
Definition Description |
Description of the Option
Definition that you selected from the Option List in the middle of the
screen. |
|
Option Value |
Custom value for the Option
Definition. For example, the Option Value for DELIVERY might be WEB. The
values depend on which Option Definition you are working with. |
|
Default Value |
Default value (when applicable) for this Option Definition. |
|
No of Charges Remaining |
Some Option Definitions set up charges. If applicable, enter the number of times that the customer will be charged this fee (9999999 indicates a permanent charge). |
|
Charge Type |
Some Option Definitions set up charges. If applicable, this populated field indicates whether those charges are charged at every BILLING, WEEKLY, or MONTHLY. |
|
Misc Fee ID* |
Some Option Definitions set up charges. If applicable, enter the ID of the miscellaneous fee to be charged (1=Diskette Fee, 2=Terms Adjustment, 3= Volume Discount, 4= Memo Transaction Fee, 5= Minimum Charge, 7=Pump Installation, 8= Network Access Fee, 9= Report Charges, 10= Card Charge, 11=Check Fee, 12=Late Fee). |
|
Value Length |
Maximum length of the option value (populated). |
|
Misc Fee Rate |
Some Option Definitions set up charges. If applicable, enter the dollar amount that the customer will be charged for this option. |
|
Decimal Position |
Required number of decimal positions of the option value field (populated). |
Bold = Mandatory
field
* = A list of defined values is displayed by clicking the “List” button
|
Audit DATA FIELD |
DESCRIPTION |
|
Updated By |
User Name that last updated the customer option (populated). |
|
Update Date |
Date and time that the option was updated (populated). |
The tab’s command button functions are as follows:
|
BUTTON |
DESCRIPTION |
|
Add ([Alt]+A) |
Allows authorized users to add customer options. |
|
Find ([Alt]+F) |
Allows you to search for an option class. |
|
Update ([Alt]+U) |
Allows authorized users to update options for this customer. |
|
Clear ([Alt]+C) |
Clears the data fields, but
does not unlock the form. |
|
Delete ([Alt]+D) |
Not in use at this time. |
|
Save ([Alt]+S) |
Saves changes made. You will be asked to confirm the changes. |
|
Exit ([Alt]+X) |
Exits the application. |
Adding or Updating a
Billing Customer Option
The BILLING class is used to charge certain fees each time the customer is billed. Options in the BILLING customer option class are:
· DISKETTE. Used to bill for a diskette containing transactions for the billing period.
· EMAIL. Used to bill the customer for emailing them their transactions for the billing period. Not in use at this time.
· FTP. Used to bill the customer for FTP’ing them their transactions for the billing period. Not in use at this time.
· RPT DEL. Used to charge the AS/400-billed customer for delivering reports each billing period.
· RPTMAILFEE. Used to charge the AS/400-billed customer for mailing reports each billing period.
· RPTFAXFEE. Used to charge the AS/400-billed customer for faxing reports each billing period.
· ADDMAILFEE. Used to charge the AS/400-billed customer for mailing reports to an additional address each billing period.
· ADDFAXFEE. Used to charge the AS/400-billed customer for faxing reports to an additional address each billing period.
· COUNTRCLUB. Used to set up a CITGO customer for the Country Club billing service.
1. Select a customer on the full mode Customer screen. Navigate to the Customer Options screen using the dropdown menu or Action List.
2. Double-click the BILLING option class on the Customer Option Classes tab. You will be navigated to the Customer Options Details tab.
3. In the Option List, select an Option Definition.
4. This step differs, depending on whether the Option Definition has already been set up for this customer.
·
If the Option Value field is blank, this option
hasn’t been set up yet. Click the ![]() button (or press [Alt]+A).
button (or press [Alt]+A).
·
If the Option Value field is not blank, this option has been set up
and can now be modified. Click the ![]() button (or press
[Alt]+U).
button (or press
[Alt]+U).
The Option Class Description, Option Definition Description, Charge Type, and Value Length will populate. If a Default Value has been created, it will also populate.
5.
Option
Value – Enter YES (mandatory).
A maximum of 500 characters is allowed.
Press [Tab] or [Enter] to proceed.
6. No of Charges Remaining – If applicable, enter the number of times the customer will be charged for this delivery. 9999999 indicates a permanent charge. Press [Tab] or [Enter] to proceed.
7. Misc
Fee ID – Click the ![]() button to select from a list of miscellaneous
fees. Press [Tab] or [Enter] to proceed.
button to select from a list of miscellaneous
fees. Press [Tab] or [Enter] to proceed.
8. Misc Fee Rate – Enter the dollar amount the customer will be charged for this delivery at each billing.
9.
Click the ![]() button (or press [Alt]+S). You will be asked
to confirm. Click the
button (or press [Alt]+S). You will be asked
to confirm. Click the ![]() button (or press [Alt]+O) to accept the
changes and save the option. The
Updated By, and Update Date fields will populate with your User name and the
current date and time.
button (or press [Alt]+O) to accept the
changes and save the option. The
Updated By, and Update Date fields will populate with your User name and the
current date and time.
You can cancel the changes by clicking the ![]() button (or pressing [Alt]+C) any time before
pressing OK.
button (or pressing [Alt]+C) any time before
pressing OK.
Adding or Updating a Card Fee Customer Option
The CARDFEE class is used to charge customers for “activated
cards”. A card is considered
“activated” if it was issued prior to the beginning of the current billing
period, is active at the time of billing, and is associated with an “unlocked”
vehicle.
Options in the CARDFEE customer option class are:
· CHARGE. Indicates whether the customer is subject to Weekly card fees (Y/N).
If a customer is set up for the fee, weekly transaction processing (regardless of the customer’s billing frequency) calculates the fee and includes it in the customer’s billing. The fee will be labeled on reports as a “Weekly Account Administration Fee”.
Note: this fee is not charged until the customer has at least one transaction.
· MINCHARGE. If the CHARGE option was set up, this indicates the minimum total card fee per week, regardless of the number of activated cards. If the MONTHLY option was set up, this indicates the minimum total card fee per Calendar month, regardless of the number of activated cards.
· MAXCHARGE. If the CHARGE option was set up, this indicates the maximum total card fee per week, regardless of the number of activated cards. If the MONTHLY option was set up, this indicates the maximum total card fee per Calendar month, regardless of the number of activated cards.
· MONTHLY. Indicates whether the customer is subject to Monthly card fees (Y/N).
If a customer is set up for the fee, Calendar month transaction processing (regardless of the customer’s billing frequency) calculates the fee and includes it in the customer’s billing. The fee will be labeled on reports as a “Monthly Account Administration Fee”.
Note: If a customer is set up for both Weekly and Monthly fees, they will not be charged Monthly fees.
· STARTWEEK. Indicates the first billing week that the customer is subject to the Weekly card fees. If the customer has no transactions in the STARTWEEK, the fee will not be charged until the customer has at least one transaction in a subsequent week.
Note: This option does not apply to Monthly card fees. To set up a grace period for Monthly card fees, use the MGRACE licensee option in the CARDFEE option class. (See the Licensee Option Values chapter for information on that option.)
1. Select a customer on the full mode Customer screen. Navigate to the Customer Options screen using the dropdown menu or Action List.
2. Double-click the CARDFEE option class on the Customer Option Classes tab. You will be navigated to the Customer Options Details tab.
3. In the Option List, select an Option Definition (CHARGE, MINCHARGE, MAXCHARGE, MONTHLY, or STARTWEEK).
4. This step differs, depending on whether the Option Definition has already been set up for this customer.
·
If the Option Value field is blank, this option
hasn’t been set up yet. Click the ![]() button (or press [Alt]+A).
button (or press [Alt]+A).
·
If the Option Value field is not blank, this option has been set up
and can now be modified. Click the ![]() button (or press [Alt]+U).
button (or press [Alt]+U).
The Option Class Description, Option Definition Description, Charge Type, and Value Length will populate. If a Default Value has been created, it will also populate.
5. Option Value – If you selected CHARGE
or MONTHLY in step 3, enter Y or N
(mandatory). A maximum of 1 character is allowed for CHARGE or MONTHLY.
If you selected MINCHARGE in step 3, enter the minimum dollar amount that the customer will be charged in card fees
per period (week if CHARGE was specified, Calendar month if MONTHLY was
specified). MINCHARGE applies
only if CHARGE or MONTHLY is Y. A maximum of 10 characters is allowed
for MINCHARGE.
If you selected
MAXCHARGE in step 3, enter the maximum
dollar amount that the customer will be charged in card fees per period (week
if CHARGE was specified, Calendar month if MONTHLY was specified). MAXCHARGE applies only if CHARGE or MONTHLY
is Y. A maximum of 10 characters is allowed for MAXCHARGE.
If you selected STARTWEEK, enter the first week that the customer will be subject to the Weekly card fees (200312, for example). STARTWEEK applies only if CHARGE is Y. A maximum of 6 characters is allowed for STARTWEEK).
Press [Tab] or [Enter] to proceed.
6. No of Charges Remaining – If applicable, enter the number of times the customer will be charged the card fee. 9999999 indicates a permanent charge. Press [Tab] or [Enter] to proceed.
7.
Misc Fee ID – If the customer is charged a card
fee, click the ![]() button to select fee 13 from the list of
miscellaneous fees. Press [Tab] or [Enter] to proceed.
button to select fee 13 from the list of
miscellaneous fees. Press [Tab] or [Enter] to proceed.
8. Misc Fee Rate – Enter the dollar amount of the card fee (for example, .50).
9.
Click the ![]() button (or press [Alt]+S). You will be asked
to confirm. Click the
button (or press [Alt]+S). You will be asked
to confirm. Click the ![]() button (or press [Alt]+O) to accept the
changes and save the option. The
Updated By, and Update Date fields will populate with your User name and the
current date and time.
button (or press [Alt]+O) to accept the
changes and save the option. The
Updated By, and Update Date fields will populate with your User name and the
current date and time.
You can cancel the
changes by clicking the ![]() button (or pressing [Alt]+C) any time before
pressing OK.
button (or pressing [Alt]+C) any time before
pressing OK.
Adding or Updating a Cardstock Customer Option
The CARDSTOCK class is used to indicate which card stock is to be used for cards. Options in the CARDSTOCK customer option class are:
· EMPLOYEE. Indicates which card stock is to be used for employee cards.
· VEHICLE. Indicates which card stock is to be used for vehicle cards.
1. Select a customer on the full mode Customer screen. Navigate to the Customer Options screen using the dropdown menu or Action List.
2. Double-click the CARDSTOCK option class on the Customer Option Classes tab. You will be navigated to the Customer Options Details tab.
3. In the Option List, select an Option Definition (EMPLOYEE or VEHICLE).
4. This step differs, depending on whether the Option Definition has already been set up for this customer.
·
If the Option Value field is blank, this option
hasn’t been set up yet. Click the ![]() button (or press [Alt]+A).
button (or press [Alt]+A).
·
If the Option Value field is not blank, this option has been set up
and can now be modified. Click the ![]() button (or press
[Alt]+U).
button (or press
[Alt]+U).
The Option Class Description, Option Definition Description, Charge Type, and Value Length will populate. If a Default Value has been created, it will also populate.
5.
Option
Value – If you selected EMPLOYEE in step 3, enter a user-defined name for
the employee cardstock (mandatory).
The name will appear on your AS/400 screen. A maximum of 20 characters
is allowed for EMPLOYEE
If you selected VEHICLE in step 3, enter a user-defined name for the vehicle cardstock (mandatory). A maximum of 10 characters is allowed for VEHICLE.
Press [Tab] or [Enter] to proceed.
6. No of Charges Remaining – If applicable, enter the number of times the customer will be charged for the cardstock. Press [Tab] or [Enter] to proceed.
7. Misc
Fee ID – If the customer is charged for the cardstock, click the ![]() button to select from a list of miscellaneous
fees. Press [Tab] or [Enter] to proceed.
button to select from a list of miscellaneous
fees. Press [Tab] or [Enter] to proceed.
8. Misc Fee Rate – Enter the dollar amount the customer will be charged for the cardstock.
9. Click the ![]() button (or press [Alt]+S). You will be asked
to confirm. Click the
button (or press [Alt]+S). You will be asked
to confirm. Click the ![]() button (or press [Alt]+O) to accept the
changes and save the option. The
Updated By, and Update Date fields will populate with your User name and the
current date and time.
button (or press [Alt]+O) to accept the
changes and save the option. The
Updated By, and Update Date fields will populate with your User name and the
current date and time.
You can cancel the
changes by clicking the ![]() button (or pressing [Alt]+C) any time before
pressing OK.
button (or pressing [Alt]+C) any time before
pressing OK.
Adding or Updating a CMR800 (Weekly Reports) Customer Option
The CMR800 class is used to set options for weekly reports. Options in the CMR800 customer option class are:
· TIMESTAMP. Indicates whether the transaction timestamp should be on the weekly reports.
· COPIES. Indicates the number of copies that should be generated for each weekly report. Not in use at this time.
1. Select a customer on the full mode Customer screen. Navigate to the Customer Options screen using the dropdown menu or Action List.
2. Double-click the CMR800 option class on the Customer Option Classes tab. You will be navigated to the Customer Options Details tab.
3. In the Option List, select an Option Definition (TIMESTAMP or COPIES).
4. This step differs, depending on whether the Option Definition has already been set up for this customer.
·
If the Option Value field is blank, this option
hasn’t been set up yet. Click the ![]() button (or press [Alt]+A).
button (or press [Alt]+A).
·
If the Option Value field is not blank, this option has been set up
and can now be modified. Click the ![]() button (or press
[Alt]+U).
button (or press
[Alt]+U).
The Option Class Description, Option Definition Description, Charge Type, and Value Length will populate. If a Default Value has been created, it will also populate.
5.
Option
Value – If you selected TIMESTAMP in step 3, enter Y or N to indicate
whether the transaction timestamp should be on the weekly reports (mandatory).
Press [Tab] or [Enter] to proceed.
6. No of Charges Remaining – If applicable, enter the number of times the customer will be charged for this option. Press [Tab] or [Enter] to proceed.
7. Misc
Fee ID – Click the ![]() button to select from a list of miscellaneous
fees. Press [Tab] or [Enter] to proceed.
button to select from a list of miscellaneous
fees. Press [Tab] or [Enter] to proceed.
8. Misc Fee Rate – Enter the dollar amount the customer will be charged for this option weekly.
9. Click the ![]() button (or press [Alt]+S). You will be asked
to confirm. Click the
button (or press [Alt]+S). You will be asked
to confirm. Click the ![]() button (or press [Alt]+O) to accept the
changes and save the option. The
Updated By, and Update Date fields will populate with your User name and the
current date and time.
button (or press [Alt]+O) to accept the
changes and save the option. The
Updated By, and Update Date fields will populate with your User name and the
current date and time.
You can cancel the
changes by clicking the ![]() button (or pressing [Alt]+C) any time before
pressing OK.
button (or pressing [Alt]+C) any time before
pressing OK.
Adding or Updating a CMR809 (Maintenance Summary) Customer Option
The CMR809 class is used to indicate which product classes should appear on the YTD Maintenance Analysis Report. Options in the CMR809 customer option class are PGRID1 through PGRID8. Each option is used to create product groups for display on the report.
1. Select a customer on the full mode Customer screen. Navigate to the Customer Options screen using the dropdown menu or Action List.
2. Double-click the CMR809 option class on the Customer Option Classes tab. You will be navigated to the Customer Options Details tab.
3. In the Option List, select a product group Option Definition (PGRID1 through PGRID8).
4. This step differs, depending on whether the Option Definition has already been set up for this customer.
·
If the Option Value field is blank, this option
hasn’t been set up yet. Click the ![]() button (or press [Alt]+A).
button (or press [Alt]+A).
·
If the Option Value field is not blank, this option has been set up
and can now be modified. Click the ![]() button (or press
[Alt]+U).
button (or press
[Alt]+U).
The Option Class Description, Option Definition Description, Charge Type, and Value Length will populate. If a Default Value has been created, it will also populate.
5.
Option
Value – For each Product Group, you can override the Default Value by
entering a different Product Group ID (mandatory).
A maximum of 7 characters is allowed.
Press [Tab] or [Enter] to proceed.
6. No of Charges Remaining – If applicable, enter the number of times the customer will be charged for this option. Press [Tab] or [Enter] to proceed.
7. Misc
Fee ID – Click the ![]() button to select from a list of miscellaneous
fees. Press [Tab] or [Enter] to proceed.
button to select from a list of miscellaneous
fees. Press [Tab] or [Enter] to proceed.
8. Misc Fee Rate – Enter the dollar amount the customer will be charged for this option.
9. Click the ![]() button (or press [Alt]+S). You will be asked
to confirm. Click the
button (or press [Alt]+S). You will be asked
to confirm. Click the ![]() button (or press [Alt]+O) to accept the
changes and save the option. The
Updated By, and Update Date fields will populate with your User name and the
current date and time.
button (or press [Alt]+O) to accept the
changes and save the option. The
Updated By, and Update Date fields will populate with your User name and the
current date and time.
You can cancel the
changes by clicking the ![]() button (or pressing [Alt]+C) any time before
pressing OK.
button (or pressing [Alt]+C) any time before
pressing OK.
Adding or Updating a CUSTOM Customer Option
The CUSTOM class is a group of options specific to just a few licensees. Options in the CUSTOM customer option class are:
· IDENTIFIER. Used to set the facility and finance number that will appear on the USPS4567 export.
·
TAXEXEMPT. Is used for
1. Select a customer on the full mode Customer screen. Navigate to the Customer Options screen using the dropdown menu or Action List.
2. Double-click the CMR809 option class on the Customer Option Classes tab. You will be navigated to the Customer Options Details tab.
3. In the Option List, select the Option Definition (IDENTIFIER or TAXEXEMPT).
4. This step differs, depending on whether the Option Definition has already been set up for this customer.
·
If the Option Value field is blank, this option
hasn’t been set up yet. Click the ![]() button (or press [Alt]+A).
button (or press [Alt]+A).
·
If the Option Value field is not blank, this option has been set up
and can now be modified. Click the ![]() button (or press
[Alt]+U).
button (or press
[Alt]+U).
The Option Class Description, Option Definition Description, Charge Type, and Value Length will populate. If a Default Value has been created, it will also populate.
5.
Option
Value – If you selected IDENTIFIER in step 3, enter the facility and
finance number to appear on the USPS4567 export (mandatory). For IDENTIFIER, a
maximum of 15 characters is allowed.
If you selected TAXEXEMPT in step 3, enter O for Off-road, G for Governmental, or D for Motor Discount (mandatory). For TAXEXEMPT, only 1 character is allowed.
Press [Tab] or [Enter] to proceed.
6. No of Charges Remaining – If applicable, enter the number of times the customer will be charged for this option. Press [Tab] or [Enter] to proceed.
7. Misc
Fee ID – Click the ![]() button to select from a list of miscellaneous
fees. Press [Tab] or [Enter] to proceed.
button to select from a list of miscellaneous
fees. Press [Tab] or [Enter] to proceed.
8. Misc Fee Rate – Enter the dollar amount the customer will be charged for this option.
9. Click the ![]() button (or press [Alt]+S). You will be asked
to confirm. Click the
button (or press [Alt]+S). You will be asked
to confirm. Click the ![]() button (or press [Alt]+O) to accept the
changes and save the option. The
Updated By, and Update Date fields will populate with your User name and the
current date and time.
button (or press [Alt]+O) to accept the
changes and save the option. The
Updated By, and Update Date fields will populate with your User name and the
current date and time.
You can cancel the
changes by clicking the ![]() button (or pressing [Alt]+C) any time before
pressing OK.
button (or pressing [Alt]+C) any time before
pressing OK.
Adding or Updating an Export File Customer Option
The EXPORTFILE class is used to set options for the delivery of export files to this customer. Options in the EXPORTFILE customer option class are:
· DELIVERY. Indicates whether export files are emailed (EMAIL) or FTP’d (FTP) to the customer.
· FORMAT. Indicates which format the export files are delivered in: .csv (CSV), tab-delimited (TAB), or a text file (TXT).
· FTPDIR. If DELIVERY is FTP, this indicates the customer directory on FleetCor’s FTP server.
· EMAILADDR. If DELIVERY is EMAIL, this indicates to which address the files will be emailed.
1. Select a customer on the full mode Customer screen. Navigate to the Customer Options screen using the dropdown menu or Action List.
2. Double-click the EXPORTFILE option class on the Customer Option Classes tab. You will be navigated to the Customer Options Details tab.
3. In the Option List, select an Option Definition (DELIVERY, FORMAT, FTPDIR, or EMAILADDR).
4. This step differs, depending on whether the Option Definition has already been set up for this customer.
·
If the Option Value field is blank, this option
hasn’t been set up yet. Click the ![]() button (or press [Alt]+A).
button (or press [Alt]+A).
·
If the Option Value field is not blank, this option has been set up
and can now be modified. Click the ![]() button (or press
[Alt]+U).
button (or press
[Alt]+U).
The Option Class Description, Option Definition Description, Charge Type, and Value Length will populate. If a Default Value has been created, it will also populate.
5.
Option Value
– If you selected DELIVERY in step 3, enter EMAIL or FTP. A maximum of 20 characters is allowed.
If you selected FORMAT in step 3, enter CSV, TAB, or TXT. A maximum of 10 characters is allowed.
If you selected FTPDIR
in step 3, enter the customer directory on FleetCor’s FTP server. A maximum of 40 characters is allowed
If you selected EMAILADDR in step 3, enter the email address to which to send notification or the export file. A maximum of 40 characters is allowed.
After you enter the Option Value, press [Tab] or [Enter] to proceed.
6. No of Charges Remaining – If applicable, enter the number of times the customer will be charged for this option. Press [Tab] or [Enter] to proceed.
7. Misc
Fee ID – Click the ![]() button to select from a list of miscellaneous
fees (mandatory). Press [Tab] or [Enter] to proceed.
button to select from a list of miscellaneous
fees (mandatory). Press [Tab] or [Enter] to proceed.
8. Misc Fee Rate – Enter the dollar amount the customer will be charged for this option.
9. Click the ![]() button (or press [Alt]+S). You will be asked
to confirm. Click the
button (or press [Alt]+S). You will be asked
to confirm. Click the ![]() button (or press [Alt]+O) to accept the
changes and save the option. The
Updated By, and Update Date fields will populate with your User name and the
current date and time.
button (or press [Alt]+O) to accept the
changes and save the option. The
Updated By, and Update Date fields will populate with your User name and the
current date and time.
You can cancel the
changes by clicking the ![]() button (or pressing [Alt]+C) any time before
pressing OK.
button (or pressing [Alt]+C) any time before
pressing OK.
Adding or Updating
a FLEETNET Customer Option
The FLEETNET class is used to indicate whether a customer receives certain reports. The FLEETNET class contains one option at this time:
· TRN85P. Used to allow the customer to pull their own TRN85P report from FleetNet.
1. Select a customer on the full mode Customer screen. Navigate to the Customer Options screen using the dropdown menu or Action List.
2. Double-click the FLEETNET option class on the Customer Option Classes tab. You will be navigated to the Customer Options Details tab.
3. In the Option List, select an Option Definition (TRN85P).
4. This step differs, depending on whether the Option Definition has already been set up for this customer.
·
![]() button (or press [Alt]+A).
button (or press [Alt]+A).
·
If the Option Value field is not blank, this
option has been set up and can now be modified. Click the ![]() button (or press
[Alt]+U).
button (or press
[Alt]+U).
The Option Class Description, Option Definition Description, Charge Type, and Value Length will populate. If a Default Value has been created, it will also populate.
5. Option Value – Enter TAB if the customer will receive the TRN85P in tab-delimited format. Enter FIXED if the customer will receive the TRN85P in fixed-length-field format.
If the Option Value field is blank, this option hasn’t been set up yet. Click the
6. Press [Tab] or [Enter] to proceed.
7. No of Charges Remaining – If applicable, enter the number of times the customer will be charged for this option. Press [Tab] or [Enter] to proceed.
8.
Misc Fee ID – Click the ![]() button to select from a list of miscellaneous
fees (mandatory). Press [Tab] or [Enter] to proceed.
button to select from a list of miscellaneous
fees (mandatory). Press [Tab] or [Enter] to proceed.
9. Misc Fee Rate – Enter the dollar amount the customer will be charged for this option at each billing.
10.
Click the ![]() button (or press [Alt]+S). You will be asked
to confirm. Click the button (or press
[Alt]+O) to accept the changes and save the option. The Updated By, and Update
Date fields will populate with your User name and the current date and time.
button (or press [Alt]+S). You will be asked
to confirm. Click the button (or press
[Alt]+O) to accept the changes and save the option. The Updated By, and Update
Date fields will populate with your User name and the current date and time.
You can cancel the
changes by clicking the button (or
pressing [Alt]+C) any time before pressing OK.
Adding or Updating a MONTHLY Customer Option
The MONTHLY class is used to charge a customer certain fees each month. Options in the MONTHLY customer option class are:
· BBS. Used to bill the customer for bulletin-board access for the month.
· DISKETTE. Used to bill for a diskette containing transactions for the month.
· FTP. Used to bill the customer for FTP’ing them their transactions for the month.
· EMAIL. Used to bill the customer for emailing them their transactions for the month.
· REPORTCHG. Used to bill the customer for their reports for the month.
Note: this fee is not generated if the customer has no transactions for the month.
· VEHCHARGE. Used to bill the customer for a monthly vehicle access charge.
1. Select a customer on the full mode Customer screen. Navigate to the Customer Options screen using the dropdown menu or Action List.
2. Double-click the MONTHLY option class on the Customer Option Classes tab. You will be navigated to the Customer Options Details tab.
3. In the Option List, select an Option Definition (BBS, DISKETTE, FTP, EMAIL, REPORTCHG, or VEHCHARGE).
4. This step differs, depending on whether the Option Definition has already been set up for this customer.
·
If the Option Value field is blank, this option
hasn’t been set up yet. Click the ![]() button (or press [Alt]+A).
button (or press [Alt]+A).
·
If the Option Value field is not blank, this option has been set up
and can now be modified. Click the ![]() button (or press
[Alt]+U).
button (or press
[Alt]+U).
The Option Class Description, Option Definition Description, Charge Type, and Value Length will populate. If a Default Value has been created, it will also populate.
5. Option Value – Enter Y if the option applies to this customer.
A maximum of 20 characters is allowed for BBS, DISKETTE, FTP, EMAIL, or REPORTCHG. A maximum of 1 character is allowed for VEHCHARGE.
6. Press [Tab] or [Enter] to proceed.
7. No of Charges Remaining – If applicable, enter the number of times the customer will be charged for this option. Press [Tab] or [Enter] to proceed.
8. Misc
Fee ID – Click the ![]() button to select from a list of miscellaneous
fees (mandatory). Press [Tab] or [Enter] to proceed.
button to select from a list of miscellaneous
fees (mandatory). Press [Tab] or [Enter] to proceed.
9. Misc Fee Rate – Enter the dollar amount the customer will be charged for this option at each billing.
10. Click the ![]() button (or press [Alt]+S). You will be asked
to confirm. Click the
button (or press [Alt]+S). You will be asked
to confirm. Click the ![]() button (or press [Alt]+O) to accept the
changes and save the option. The
Updated By, and Update Date fields will populate with your User name and the
current date and time.
button (or press [Alt]+O) to accept the
changes and save the option. The
Updated By, and Update Date fields will populate with your User name and the
current date and time.
You can cancel the
changes by clicking the ![]() button (or pressing [Alt]+C) any time before
pressing OK.
button (or pressing [Alt]+C) any time before
pressing OK.
Adding or Updating a Pre-Embossed Card Customer Option
The PREEMBOSS class is used to indicate whether the customer can issue pre-embossed cards. Options in the PREEMBOSS customer option class are:
· OVERRIDE. Indicates whether the customer can issue pre-embossed cards. An “N” (the default) indicates that the PREEMBOSS_FLAG licensee option (in the DFTVALUES option class) takes effect. A “Y” overrides the PREEMBOSS_FLAG licensee option for this customer.
For example, if PREEMBOSS_FLAG is set to “Y”, the customer OVERRIDE defaults to “N”, meaning that the customer can use pre-embossed cards. To prevent this customer from doing so, set FLAG to “Y”.
Similarly, if PREEMBOSS_FLAG is set to “N”, the customer OVERRIDE defaults to “N”, meaning in this case that the customer cannot use pre-embossed cards. To allow this customer to do so, set FLAG to “Y”.
1. Select a customer on the full-mode Customer screen. Navigate to the Customer Options screen using the dropdown menu or Action List.
2. Double-click the PREEMBOSS option class on the Customer Option Classes tab. You will be navigated to the Customer Options Details tab.
3. In the Option List, select an Option Definition (OVERRIDE).
4. This step differs, depending on whether the Option Definition has already been set up for this customer.
·
If the Option Value field is blank, this option
hasn’t been set up yet. Click the ![]() button (or press [Alt]+A).
button (or press [Alt]+A).
·
If the Option Value field is not blank, this option has been set up
and can now be modified. Click the ![]() button (or press
[Alt]+U).
button (or press
[Alt]+U).
The Option Class Description, Option Definition Description, Charge Type, and Value Length will populate. If a Default Value has been created, it will also populate.
5. Option Value – Enter Y to override the PREEMBOSS_FLAG licensee option. Enter N to reset the value so that PREEMBOSS_FLAG takes effect. A maximum of 1 character is allowed. Press [Tab] or [Enter] to proceed.
6. No of Charges Remaining – If applicable, enter the number of times the customer will be charged for this option. Press [Tab] or [Enter] to proceed.
7.
Misc Fee ID – Click the ![]() button to select from a list of miscellaneous
fees (mandatory). Press [Tab] or [Enter] to proceed.
button to select from a list of miscellaneous
fees (mandatory). Press [Tab] or [Enter] to proceed.
8. Misc Fee Rate – Enter the dollar amount the customer will be charged for this option at each billing.
9.
Click the ![]() button (or press [Alt]+S). You will be asked
to confirm. Click the
button (or press [Alt]+S). You will be asked
to confirm. Click the ![]() button (or press [Alt]+O) to accept the
changes and save the option. The
Updated By, and Update Date fields will populate with your User name and the
current date and time.
button (or press [Alt]+O) to accept the
changes and save the option. The
Updated By, and Update Date fields will populate with your User name and the
current date and time.
You can cancel the
changes by clicking the ![]() button (or pressing [Alt]+C) any time before
pressing OK.
button (or pressing [Alt]+C) any time before
pressing OK.
Adding or Updating a REPORTS Customer Option
The REPORTS class is used to indicate which optional reports the
customer is to receive, and how often.
(Enter W for weekly, M for Monthly, and Y for both.).
Options in the REPORTS customer option class are:
· CMR833. Indicates whether the customer receives the Preventative Maintenance Due or Past Due report (W/M/Y).
· CMR809. Indicates whether the customer receives the Year-to-Date Maintenance Analysis report (W/M/Y).
· DELIVERY. Indicates how the reports are delivered (MAIL, FAX, HAND, or WEB).
This fee is not generated if the customer has no transactions for the time period covered by the report (the week or month).
Note: The DELIVERY option does not apply to customers whose licensee uses the new FleetCor Fulfillment Services. Instead, set the CUST_FFMT licensee option (DFTVALUES class) to Y and specify the desired delivery methods on the Addresses tab of the Customer screen. See the Licensee Options chapter and Customer chapter for more information.
· CMR802. Indicates whether the customer receives the Fleet Management Report by Employee (W/M/Y).
· CMR804. Indicates whether the customer receives the Fleet Fuel Summary by Employee (W/M/Y).
· CMR805 (W/M/Y). Indicates whether the customer receives the Fleet Fuel Summary.
· CMR807. Indicates whether the customer receives the Customer Fleet Analysis (W/M/Y).
· CMR820. Indicates whether the customer receives the DOTD Invoice (W/M/Y).
· CMR840. Indicates whether the customer receives the Customer Tax Management report (W/M/Y).
· CMR845. Indicates whether the customer receives the Customer Federal Tax Exempt report (W/M/Y).
· CMR846. Indicates whether the customer receives the Customer Tax Exempt report (W/M/Y).
· CMR831. Indicates whether the customer receives the Customer Invoice Register (W/M/Y).
· CMR815. Indicates whether the customer receives the Fleet Fuel Management Report--Fuel Only (W/M/Y).
· CMR816. Indicates whether the customer receives the Fleet Maintenance Management Report--Maintenance Only (W/M/Y).
1. Select a customer on the full mode Customer screen. Navigate to the Customer Options screen using the dropdown menu or Action List.
2. Double-click the REPORTS option class on the Customer Option Classes tab. You will be navigated to the Customer Options Details tab.
3. In the Option List, select an Option Definition (CMR833, CMR809, DELIVERY, CMR802, CMR804, CMR805, CMR807, CNR820, CMR840, CMR845, CMR846, CMR831, CMR815 or CMR816).
4. This step differs, depending on whether the Option Definition has already been set up for this customer.
·
If the Option Value field is blank, this option
hasn’t been set up yet. Click the ![]() button (or press [Alt]+A).
button (or press [Alt]+A).
·
If the Option Value field is not blank, this option has been set up
and can now be modified. Click the ![]() button (or press [Alt]+U).
button (or press [Alt]+U).
The Option Class Description, Option Definition Description, Charge Type, and Value Length will populate. If a Default Value has been created, it will also populate.
5. Option Value – If you selected a CMR in step 3, enter W if the customer wants the report weekly, M for monthly, or Y for both.
If you selected DELIVERY in step 3, enter MAIL, FAX, HAND or WEB. Note: The DELIVERY option does not apply to customers whose licensee uses the new FleetCor Fulfillment Services. Instead, set the CUST_FFMT licensee option (DFTVALUES class) to Y and specify the desired delivery methods on the Addresses tab of the Customer screen. See the Licensee Options chapter and Customer chapter for more information.
After you enter the Option Value, press [Tab] or [Enter] to proceed.
6. No of Charges Remaining – If applicable, enter the number of times the customer will be charged for this option. Press [Tab] or [Enter] to proceed.
7. Misc
Fee ID – Click the ![]() button to select from a list of miscellaneous
fees (mandatory). Press [Tab] or [Enter] to proceed.
button to select from a list of miscellaneous
fees (mandatory). Press [Tab] or [Enter] to proceed.
8. Misc Fee Rate – Enter the dollar amount the customer will be charged for this option at each billing.
9.
Click the ![]() button (or press [Alt]+S). You will be asked
to confirm. Click the
button (or press [Alt]+S). You will be asked
to confirm. Click the ![]() button (or press [Alt]+O) to accept the
changes and save the option. The
Updated By, and Update Date fields will populate with your User name and the
current date and time.
button (or press [Alt]+O) to accept the
changes and save the option. The
Updated By, and Update Date fields will populate with your User name and the
current date and time.
You can cancel the changes by clicking the ![]() button (or pressing [Alt]+C) any time before
pressing OK.
button (or pressing [Alt]+C) any time before
pressing OK.