Licensee Option Values
This screen provides a way for licensees to set defaults and customize information.
The Licensee Option Values screen consists of two tabs:
· Licensee Option Value List lists options set up for the selected licensee.
· Licensee Option Value Detail displays more information about a specific licensee option. If you are authorized to do so, you can add or change information on this tab.
To access the Licensee Option Values screen, first select a licensee on the Licensee screen (you can work with only one licensee at a time). Then do one of the following:
· Select Licensee Options from the action list:
· Select Licensee -> Licensee Options from the drop-down menu:

Licensee Option Value List
This tab displays summary licensee option information for the selected licensee:
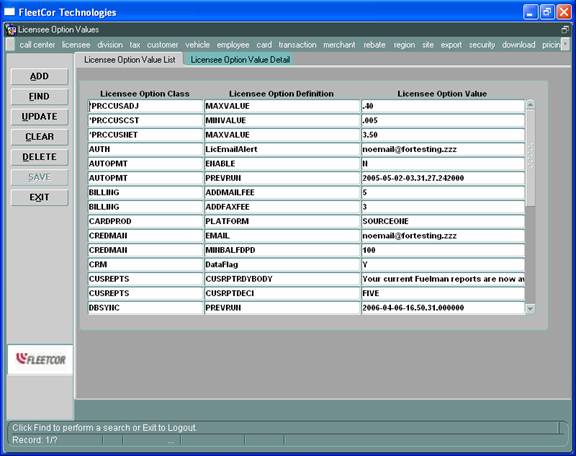
The tab’s data fields are as
follows:
|
DATA FIELD |
DESCRIPTION |
|
Licensee Option Class |
Type of licensee option. |
|
Licensee Option Definition |
Specific field being customized. |
|
Licensee Option Value |
Custom value for the Licensee Option Definition. |
The tab’s command button functions are as follows:
|
BUTTON |
DESCRIPTION |
|
Add ([Alt]+A) |
Allows authorized users to create a new licensee option value. |
|
Find ([Alt]+F) |
Allows you to search for an option. See the Getting Started chapter for tips. |
|
Update ([Alt]+U) |
Allows authorized users to update the licensee option value. |
|
Clear ([Alt]+C) |
Clears the data fields, but
does not unlock the form. |
|
Delete ([Alt]+D) |
Not in use at this time. |
|
Save ([Alt]+S) |
Saves changes made. You will be asked to confirm the changes. |
|
Exit ([Alt]+X) |
Exits the application. |
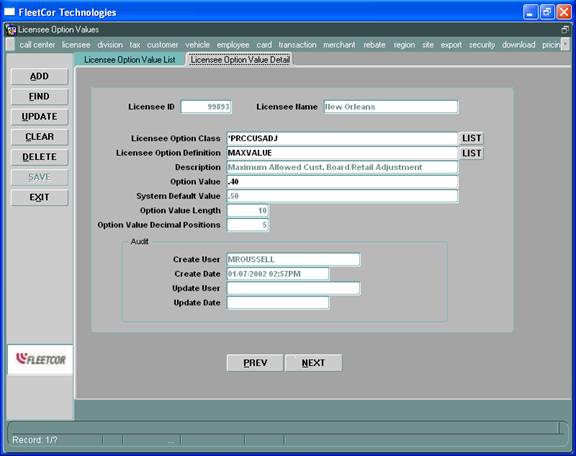
Licensee Option Value Detail
This tab displays more information about the selected licensee option:
To view another option, click the ![]() or
or ![]() button (or press
[Alt]+P or [Alt]+N, respectively). (See the Getting
Started chapter for help).
button (or press
[Alt]+P or [Alt]+N, respectively). (See the Getting
Started chapter for help).
The tab’s data fields are as follows:
|
DATA FIELD |
DESCRIPTION |
|
Licensee ID |
ID of the selected licensee (populated). |
|
Licensee Name |
Name of the selected licensee (populated). |
|
Licensee Option Class* |
Type of licensee option. |
|
Licensee Option Definition* |
Specific field being customized. For example, a Licensee Option Definition for CUSREPTS is CUSRPTEMAILBODY. For a list of these for each option class, see the relevant section on adding options: |
|
Description |
Description of the Licensee Option Definition (populated). |
|
Option Value |
Custom value for the Licensee Option Definition. For example, the value for CUSRPTEMAILBODY might be “Your reports are attached.” |
|
System Default Value |
Default of the Licensee Option Definition (populated when
applicable) |
|
Option Value Length |
Maximum length of the option value (populated). |
|
Option Value Decimal Positions |
Required number of decimal positions of the option value field (populated if applicable). |
Bold = Mandatory
field
* = A list of defined values is displayed by clicking the “List” button
|
Audit DATA FIELD |
DESCRIPTION |
|
Create User |
User Name that created the option (populated). |
|
Create Date |
Date and time that the option was created (populated). |
|
Update User |
User Name that last updated the option (populated). |
|
Update Date |
Date and time that the option was updated (populated). |
The tab’s command button functions are as follows:
|
BUTTON |
DESCRIPTION |
|
Add ([Alt]+A) |
Allows authorized users to create a new licensee option value. |
|
Find ([Alt]+F) |
Allows you to search for an option. |
|
Update ([Alt]+U) |
Allows authorized users to update the licensee option value. |
|
Clear ([Alt]+C) |
Clears the data fields, but
does not unlock the form. |
|
Delete ([Alt]+D) |
Not in use at this time. |
|
Save ([Alt]+S) |
Saves changes made. You will be asked to confirm. |
|
Exit ([Alt]+X) |
Exits the application. |
Adding an Automatic Payment Option
1. Select a licensee on the Licensee screen, and navigate to the Licensee Option Values screen in one of the ways described at the beginning of this chapter.
2.
Click the ![]() button (or press [Alt]+A).
button (or press [Alt]+A).
3. Licensee Option Class – Select AUTOPMT from the list box (mandatory). (See the Getting Started chapter if you need help with list windows.)
4.
Licensee Option Definition – Click the ![]() button to select a definition (mandatory).
button to select a definition (mandatory).
5. Option Value – Enter a custom value for the Licensee Option Definition (mandatory):
|
LICENSEE
OPTION DEFINITION |
LICENSEE
OPTION VALUE |
|
ENABLE |
Indicates whether ACH and Credit Card payments should be automatically applied (Y/N). |
|
PREVRUN |
Date that the last automatic payment was applied (FleetNet inserts the value in this field). |
|
PRINTOUTQ |
Out queue name for the automatic payment report. QPRINT is the default. |
6.
Click the ![]() button (or press [Alt]+S). You will be asked
to confirm. To accept the changes, click the
button (or press [Alt]+S). You will be asked
to confirm. To accept the changes, click the ![]() button (or press [Alt]+O).
button (or press [Alt]+O).
You can cancel the
changes by clicking the ![]() button (or pressing [Alt]+C) any time before
pressing OK.
button (or pressing [Alt]+C) any time before
pressing OK.
Adding an Authorization Licensee Option
1. Select a licensee on the Licensee screen, and navigate to the Licensee Option Values screen in one of the ways described at the beginning of this chapter.
2.
Click the ![]() button (or press [Alt]+A).
button (or press [Alt]+A).
3. Licensee Option Class – Select AUTH from the list box (mandatory).
4.
Licensee Option Definition – Click the ![]() button to select a definition (mandatory).
button to select a definition (mandatory).
5. Option Value – Enter a custom value for the Licensee Option Definition (mandatory):
|
LICENSEE
OPTION DEFINITION |
LICENSEE
OPTION VALUE |
|
LicEmailAlert |
Licensee email address to which the authorizer sends alerts regarding data discrepancies. |
6.
Click the ![]() button (or press [Alt]+S). You will be asked
to confirm. To accept the changes, click the
button (or press [Alt]+S). You will be asked
to confirm. To accept the changes, click the ![]() button (or press [Alt]+O).
button (or press [Alt]+O).
You can cancel the
changes by clicking the ![]() button (or pressing [Alt]+C) any time before
pressing OK.
button (or pressing [Alt]+C) any time before
pressing OK.
Adding a Card Fee Licensee Option
1. Select a licensee on the Licensee screen, and navigate to the Licensee Option Values screen in one of the ways described at the beginning of this chapter.
2.
Click the ![]() button (or press [Alt]+A).
button (or press [Alt]+A).
3. Licensee Option Class – Select CARDFEE from the list box (mandatory).
4.
Licensee Option Definition – Click the ![]() button to select a definition (mandatory).
button to select a definition (mandatory).
5. Option Value – Enter a custom value for the Licensee Option Definition (mandatory):
|
LICENSEE
OPTION DEFINITION |
LICENSEE
OPTION VALUE |
|
MGRACE |
Grace period for Monthly card fees. This is the number of days (relative to the date the customer record is created) that the customer will be exempted from Monthly card fees (even if the customer options are set up to charge that customer). |
6.
Click the ![]() button (or press [Alt]+S). You will be asked
to confirm. To accept the changes, click the
button (or press [Alt]+S). You will be asked
to confirm. To accept the changes, click the ![]() button (or press [Alt]+O).
button (or press [Alt]+O).
You can cancel the changes by clicking the ![]() button (or pressing [Alt]+C) any time before
pressing OK.
button (or pressing [Alt]+C) any time before
pressing OK.
Adding a Card Production Licensee Option
1. Select a licensee on the Licensee screen, and navigate to the Licensee Option Values screen in one of the ways described at the beginning of this chapter.
2. Click
the ![]() button (or press [Alt]+A).
button (or press [Alt]+A).
3. Licensee Option Class – Select CARDPROD from the list box (mandatory).
4. Licensee
Option Definition – Click the ![]() button to select a definition (mandatory).
button to select a definition (mandatory).
5. Option Value – Enter a custom value for the Licensee Option Definition (mandatory):
|
LICENSEE OPTION DEFINITION |
LICENSEE OPTION VALUE |
|
PLATFORM |
Platform on which cards are produced for this Licensee (AS400 (the default), or SOURCEONE). |
6. Click
the ![]() button (or press [Alt]+S). You will be asked
to confirm. To accept the changes, click the
button (or press [Alt]+S). You will be asked
to confirm. To accept the changes, click the ![]() button (or press [Alt]+O).
button (or press [Alt]+O).
You can cancel the changes by clicking the ![]() button (or pressing [Alt]+C) any time before
pressing OK.
button (or pressing [Alt]+C) any time before
pressing OK.
Adding a Credit Management Licensee Option
1. Select a licensee on the Licensee screen, and navigate to the Licensee Option Values screen in one of the ways described at the beginning of this chapter.
2.
Click the ![]() button (or press [Alt]+A).
button (or press [Alt]+A).
3. Licensee Option Class – Select CREDMAN from the list box (mandatory).
4.
Licensee Option Definition – Click the ![]() button to select a definition (mandatory).
button to select a definition (mandatory).
5. Option Value – Enter a custom value for the Licensee Option Definition (mandatory):
|
LICENSEE
OPTION DEFINITION |
LICENSEE
OPTION VALUE |
|
|
E-mail address for credit management report. |
|
MINBALFDPD |
Minimum balance for determining Past Due Invoices to report. |
6. Click
the ![]() button (or press [Alt]+S). You will be asked
to confirm. To accept the changes, click the
button (or press [Alt]+S). You will be asked
to confirm. To accept the changes, click the ![]() button (or press [Alt]+O).
button (or press [Alt]+O).
You can cancel the
changes by clicking the ![]() button (or pressing [Alt]+C) any time before
pressing OK.
button (or pressing [Alt]+C) any time before
pressing OK.
Adding a Customer Board/Retail Adjustment Licensee Option
This option sets the maximum and minimum acceptable adjustments to board (A) and retail (R) prices. If the licensee does not have values set for this option, the default MAXVALUE (.50) and MINVALUE (-.25) are used.
1. Select a licensee on the Licensee screen, and navigate to the Licensee Option Values screen in one of the ways described at the beginning of this chapter.
2.
Click the ![]() button (or press [Alt]+A).
button (or press [Alt]+A).
3. Licensee Option Class – Select *PRCCUSADJfrom the list box (mandatory).
4.
Licensee Option Definition – Click the ![]() button to select a definition (mandatory).
button to select a definition (mandatory).
5. Option Value – Enter a custom value for the Licensee Option Definition (mandatory):
|
LICENSEE
OPTION DEFINITION |
LICENSEE
OPTION VALUE |
|
MAXVALUE |
Maximum adjustment allowed for the customer board/retail price. |
|
MINVALUE |
Maximum adjustment allowed for the customer board/retail price. |
6. Click
the ![]() button (or press [Alt]+S). You will be asked
to confirm. To accept the changes, click the
button (or press [Alt]+S). You will be asked
to confirm. To accept the changes, click the ![]() button (or press [Alt]+O).
button (or press [Alt]+O).
You can cancel the
changes by clicking the ![]() button (or pressing [Alt]+C) any time before
pressing OK.
button (or pressing [Alt]+C) any time before
pressing OK.
Adding a Customer Cost Adjustment Licensee Option
This option sets the maximum and minimum acceptable adjustments to all customer prices except the following:
· Board (A).
· Retail (R).
· Net-amount-before-taxes (K).
· Net-amount-including-taxes (P) price.
If the licensee does not have values set for this option, the default MAXVALUE (.50) and MINVALUE (.04) are used.
1. Select a licensee on the Licensee screen, and navigate to the Licensee Option Values screen in one of the ways described at the beginning of this chapter.
2.
Click the ![]() button (or press [Alt]+A).
button (or press [Alt]+A).
3. Licensee Option Class – Select *PRCCUSCST from the list box (mandatory).
4.
Licensee Option Definition – Click the ![]() button to select a definition (mandatory).
button to select a definition (mandatory).
5. Option Value – Enter a custom value for the Licensee Option Definition (mandatory):
|
LICENSEE
OPTION DEFINITION |
LICENSEE
OPTION VALUE |
|
MAXVALUE |
Maximum adjustment allowed for the customer cost. |
|
MINVALUE |
Maximum adjustment allowed for the customer cost. |
6. Click
the ![]() button (or press [Alt]+S). You will be asked
to confirm. To accept the changes, click the
button (or press [Alt]+S). You will be asked
to confirm. To accept the changes, click the ![]() button (or press [Alt]+O).
button (or press [Alt]+O).
You can cancel the
changes by clicking the ![]() button (or pressing [Alt]+C) any time before
pressing OK.
button (or pressing [Alt]+C) any time before
pressing OK.
Adding a Customer Net Price Licensee Option
This option sets the maximum and minimum acceptable values for the net-amount-before-taxes (K) and net-amount-including-taxes (P) prices. If the licensee does not have values set for this option, the default MAXVALUE (1.99999) and MINVALUE (.50) are used.
1. Select a licensee on the Licensee screen, and navigate to the Licensee Option Values screen in one of the ways described at the beginning of this chapter.
2.
Click the ![]() button (or press [Alt]+A).
button (or press [Alt]+A).
3. Licensee Option Class – Select *PRCCUSNET from the list box (mandatory).
4.
Licensee Option Definition – Click the ![]() button to select a definition (mandatory).
button to select a definition (mandatory).
5. Option Value – Enter a custom value for the Licensee Option Definition (mandatory):
|
LICENSEE OPTION DEFINITION |
LICENSEE OPTION VALUE |
|
MAXVALUE |
Maximum customer net price allowed. |
|
MINVALUE |
Maximum customer net price allowed. |
6.
Click the ![]() button (or press [Alt]+S). You will be asked
to confirm. To accept the changes, click the
button (or press [Alt]+S). You will be asked
to confirm. To accept the changes, click the ![]() button (or press [Alt]+O).
button (or press [Alt]+O).
You can cancel the
changes by clicking the ![]() button (or pressing [Alt]+C) any time before
pressing OK.
button (or pressing [Alt]+C) any time before
pressing OK.
Adding a Customer Reports Licensee Option
1. Select a licensee on the Licensee screen, and navigate to the Licensee Option Values screen in one of the ways described at the beginning of this chapter.
2. Click
the ![]() button (or press [Alt]+A).
button (or press [Alt]+A).
3. Licensee Option Class – Select CUSREPTS from the list box (mandatory).
4. Licensee
Option Definition – Click the ![]() button to select a definition (mandatory).
button to select a definition (mandatory).
5. Option Value – Enter a custom value for the Licensee Option Definition (mandatory):
|
LICENSEE OPTION DEFINITION |
LICENSEE OPTION VALUE |
|
ARCHIVE |
Indicates whether a Laservault archive copy of customer reports will be generated (Y or N). “Y” is the default. |
|
CUSRPTADDR |
Indicates whether the customer’s name and address should be printed flush left or indented (LEFT or INDENT). |
|
CUSRPTDECI |
Indicates the number of decimal positions (THREE or FIVE) shown in the PRICE and TAX columns of the CRM800, CRM802 and CMR815 reports. |
|
CUSRPTEMAILBODY |
Body text (maximum of 500 characters) of emails to which customer reports are attached. |
|
CUSRPTEMAILSUBJ |
Subject line (maximum of 256 characters) of emails to which customer reports are attached. |
|
CUSRPTRDYBODY |
Body text (maximum of 500 characters) of emails in which customers are referred to their latest reports. |
|
CUSRPTRDYSUBJ |
Subject line (maximum of 256 characters) of emails in which customers are referred to their latest reports. |
|
CUSRPTWRIA |
A discount must be greater than this amount in order to be displayed on the new CMR800. The default is 0 (dollars). |
|
CUSRPTWRID |
Indicates which type of discounts should be displayed on the CMR800 (RETAIL, BOARD, or BOTH). |
|
CUSRPTWRIF |
Indicates which CMR800 format is used. “Y” indicates that the format that shows discounts should be used. “N”, the default, indicates that the format that does not show discounts should be used. |
|
CUSRPTWRIP |
A discount must be greater than this percentage (of the total) in order to be displayed on the new CMR800. The default is 0 (%). |
6.
Click the ![]() button (or press [Alt]+S). You will be asked
to confirm. To accept the changes, click the
button (or press [Alt]+S). You will be asked
to confirm. To accept the changes, click the ![]() button (or press [Alt]+O).
button (or press [Alt]+O).
You
can cancel the changes by clicking the ![]() button (or pressing [Alt]+C) any time before
pressing OK.
button (or pressing [Alt]+C) any time before
pressing OK.
Adding a Default Values Licensee Option
To save time during customer setup, enter commonly used values as defaults for your customers. If a specific customer requires a different value, you can change it during customer setup.
1. Select a licensee on the Licensee screen, and navigate to the Licensee Option Values screen in one of the ways described at the beginning of this chapter.
2. Click
the ![]() button (or press [Alt]+A).
button (or press [Alt]+A).
3. Licensee Option Class – Select DFTVALUE from the list box (mandatory).
4. Licensee
Option Definition – Click the ![]() button to select a definition (mandatory).
button to select a definition (mandatory).
5. Option Value – Enter a custom value for the Licensee Option Definition (mandatory):
|
LICENSEE OPTION DEFINITION |
LICENSEE OPTION VALUE |
|
CUST.ALLOW_ARCO |
Can customers fuel at ARCO? (Y/N). |
|
CUST.ALLOW_OREGON |
Can customers pump fuel in |
|
CUST.CARD_SYS |
Card system (1 or 2). |
|
CUST.CONTRACT_FLAG |
Contract (Y) or Non-Contract (N). |
|
CUST.CURRENCY_ID |
Currency. |
|
CUST.MEAS_SYS |
Measurement system (US or METRIC). |
|
CUST.PRICE_REF |
Price reference. |
|
CUST.PRINT_PRICE_FLAG |
Will the price be printed on receipts? (Y/N) |
|
CUST_BILL_GRP.BILL_FREQ |
Bill frequency for the bill group (CALENDAR (calendar month), DAILY, MONTHLY (Fuelman month), or WEEKLY (Mondays)). |
|
CUST_BILL_GRP.CURRENCY_ID |
Currency for the bill group. |
|
CUST_BILL_GRP.ENFORCE_CREDIT_LIMIT |
Will credit limits be enforced for the bill group? (Y/N) |
|
CUST_BILL_GRP.LATE_CHARGE_FLAG |
Will late fees be charged for the bill group? (Y/N). |
|
CUST_BILL_GRP.NONFUEL_INV_FLAG |
Will separate maintenance invoices be prepared for the bill group? (Y/N) |
|
CUST_BILL_GRP.PRINT_STATEMENT_FLAG |
Will statements be printed for the bill group? (Y/N) |
|
CUST_BILL_GRP.WARN_PERCENT |
Default credit limit warning percentage. |
|
CUST_CARD_GRP.CARD_TYPE_ID |
Default card type: 1 = Fuelman Classic 2 = Fuelman Plus 3 = Gascard Original 4 = Gascard 5 = Sinclair 6 = Shell 7 = CFN 8 = Mastercard |
|
CUST_VOL_GRP.REBATE_FREQ |
Rebate frequency. |
|
MAX_NUMBER_PRE_EMBOSSED_CARDS |
Maximum number of pre-embossed cards that can be requested at one time. See Pre-Embossed Cards in the Licensee chapter. |
|
MERCH_FFMT |
Indicates whether the licensee uses Fulfillment Services for its merchants (Y/N). |
|
MIN_NUMBER_PRE_EMBOSSED_CARDS |
Minimum number of pre-embossed cards that can be requested at one time. |
|
Indicates whether the licensee’s customers can assign pre-embossed cards to their vehicles. “Y” indicates Yes. “N” (the default) indicates No. You can override this setting on a customer-by-customer basis by setting the OVERRIDE customer option (in the PREEMBOSS option class) to “Y”. See Adding or Updating a Pre-Embossed Card Customer Option in the Customer Options chapter for more information. |
|
|
TRX.TRX_DATE |
Transaction date. |
|
TRX.TRX_WEEK_NO |
Transaction week number (maximum of 2 characters). |
|
TX_DOTD_TAX_ID |
Licensee Tax ID for the TX DOTD Export (accessed via the TX DOTD screen). |
|
VEH.CYCLE_FUEL_DENY_LIMIT |
Gallons of fuel that can be purchased for a vehicle during a 1-week cycle (Mon. – Sun.) before the transaction is denied. |
|
VEH.CYCLE_FUEL_RPT_LIMIT |
Gallons of fuel that can be purchased during a 1-week cycle before the transaction is reported as an exception. |
|
VEH.CYCLE_MISC_DENY_LIMIT |
Dollar amount that can be spent on miscellaneous items for a vehicle in a 1-week cycle before the next transaction is denied. |
|
VEH.CYCLE_MISC_RPT_LIMIT |
Dollar amount that can be spent on miscellaneous items for a vehicle in a 1-week cycle before the next transaction is reported as an exception. |
|
VEH.CYCLE_OIL_DENY_LIMIT |
Dollar amount that can be spent on oil for a vehicle in a 1-week cycle before the next transaction is denied. |
|
VEH.CYCLE_OIL_RPT_LIMIT |
Dollar amount that can be spent on oil for a vehicle in a 1-week cycle before the next transaction is reported as an exception. |
|
VEH.CYCLE_TBA_DENY_LIMIT |
Dollar amount that can be spent on Tires, Batteries, and Accessories (TBA) for a vehicle in a 1-week cycle before the next transaction is denied. |
|
VEH.CYCLE_TBA_RPT_LIMIT |
Dollar amount that can be spent on TBA for a vehicle in a 1-week cycle before the next transaction is reported as an exception. |
|
VEH.DAILY_FUEL_DENY_LIMIT |
Gallons of fuel that can be purchased for a vehicle in a 24-hour period (midnight-midnight) before the transaction is denied. |
|
VEH.DAILY_FUEL_RPT_LIMIT |
Gallons of fuel that can be purchased for a vehicle in a 24-hour period before the transaction is reported as an exception. |
|
VEH.DAILY_TRX_CNT_RPT_LIMIT |
Number of completed transactions per vehicle per 24-hour period that can occur before issuing a warning. |
|
VEH.RPT_ACTION_FLAG |
Method of notifying the customer when an exception occurs (E=Email and Report, or R=Report only). |
|
VEH.TANK_LIMIT |
Typical size of the fuel tank (in gallons) installed in a majority of the fleet. |
6.
Click the ![]() button (or press [Alt]+S). You will be asked
to confirm. To accept the changes, click the
button (or press [Alt]+S). You will be asked
to confirm. To accept the changes, click the ![]() button (or press [Alt]+O).
button (or press [Alt]+O).
You can cancel the changes by clicking the ![]() button (or pressing [Alt]+C) any time before
pressing OK.
button (or pressing [Alt]+C) any time before
pressing OK.
Adding a Finance Charge Licensee Option
1. Select a licensee on the Licensee screen, and navigate to the Licensee Option Values screen in one of the ways described at the beginning of this chapter.
2. Click
the ![]() button (or press [Alt]+A).
button (or press [Alt]+A).
3. Licensee Option Class – Select FINCHG from the list box (mandatory).
4. Licensee
Option Definition – Click the ![]() button to select a definition (mandatory).
button to select a definition (mandatory).
5. Option Value – Enter a custom value for the Licensee Option Definition (mandatory):
|
LICENSEE OPTION DEFINITION |
LICENSEE OPTION VALUE |
|
ENABLE |
Should interest charges be calculated for this licensee’s customers? (Y/N). This can be overridden for an individual bill group by checking (or unchecking) the Late Charge flag on the full-mode Customer screen (Billing tab). |
|
FEEID |
Miscellaneous Fee ID for the interest charges. |
|
GRACEDAYS |
Days past due before charging a late fee. |
|
MINBAL |
Minimum balance at which a late fee would be charged. If the outstanding amount on an invoice is less than this amount, a late fee is not charged. This can be overridden for an individual bill group by entering a different amount in the Late Fee Minimum Balance field on the full-mode Customer screen (Billing tab). |
|
MAXFEE |
Maximum dollar amount that can be entered in the Late Fee Amount field on the full-mode Customer screen (Billing tab). |
|
MAXPCT |
Maximum percent that can be entered in the Late Fee Amount field on the full-mode Customer screen (Billing tab). |
|
MINFEE |
Minimum dollar amount that can be entered in the Late Fee Amount field on the full-mode Customer screen (Billing tab). |
|
MINPCT |
Minimum percent that can be entered in the Late Fee Amount field on the full-mode Customer screen (Billing tab). |
|
RATE |
If “TYPE” is FIXED, this is the fixed dollar amount to be charged for late fees. If “TYPE” is PERCENT, this is the late fee charge interest rate. Enter this as a decimal (.03 for 3%). This can be overridden for an individual bill group by entering a different amount in the Late Fee Amount field on the full-mode Customer screen (Billing tab). |
|
TYPE |
Late fee type (FIXED or PERCENT). PERCENT is the default. This can be overridden for an individual bill group by selecting the other value in the Late Fee Type field on the full-mode Customer screen (Billing tab). |
6. Click the ![]() button (or press [Alt]+S). You will be asked
to confirm. To accept the changes, click the
button (or press [Alt]+S). You will be asked
to confirm. To accept the changes, click the ![]() button (or press [Alt]+O).
button (or press [Alt]+O).
You can cancel
the changes by clicking the ![]() button (or pressing [Alt]+C) any time before
pressing OK.
button (or pressing [Alt]+C) any time before
pressing OK.
Adding an Interest Charge Licensee Option
1. Select a licensee on the Licensee screen, and navigate to the Licensee Option Values screen in one of the ways described at the beginning of this chapter.
2.
Click the ![]() button (or press [Alt]+A).
button (or press [Alt]+A).
3. Licensee Option Class – Select INTCHG from the list box (mandatory).
4.
Licensee Option Definition – Click the ![]() button to select a definition (mandatory).
button to select a definition (mandatory).
5. Option Value – Enter a custom value for the Licensee Option Definition (mandatory):
|
LICENSEE
OPTION DEFINITION |
LICENSEE
OPTION VALUE |
|
ENABLE |
Should interest charges be calculated for this licensee’s customers? (Y/N). This can be overridden for an individual bill group by checking (or unchecking) the Late Charge flag on the full-mode Customer screen (Billing tab). |
|
FEEID |
Miscellaneous Fee ID for the interest charges. |
|
GRACEDAYS |
Days past due before charging a late fee. |
|
RATE |
This is the finance charge interest rate. Enter this as a decimal (.03 for 3%). |
6.
Click the ![]() button (or press [Alt]+S). You will be asked
to confirm. To accept the changes, click the
button (or press [Alt]+S). You will be asked
to confirm. To accept the changes, click the ![]() button (or press [Alt]+O).
button (or press [Alt]+O).
You can cancel
the changes by clicking the ![]() button (or pressing [Alt]+C) any time before
pressing OK.
button (or pressing [Alt]+C) any time before
pressing OK.
Adding a Login Security Licensee Option
1. Select a licensee on the Licensee screen, and navigate to the Licensee Option Values screen in one of the ways described at the beginning of this chapter.
2. Click
the ![]() button (or press [Alt]+A).
button (or press [Alt]+A).
3. Licensee Option Class – Select LoginSecurity from the list box (mandatory).
4. Licensee
Option Definition – Click the ![]() button to select a definition (mandatory).
button to select a definition (mandatory).
5. Option Value – Enter a custom value for the Licensee Option Definition (mandatory).
|
LICENSEE OPTION DEFINITION |
LICENSEE OPTION VALUE |
|
InactiveUserDays |
Number of days (1-90) of inactivity permitted for this licensee’s Customer- and Fleet-level users before the account is deactivated. |
|
PasswordExpiredDays |
Number of days (0-365) between forced password expiration for this licensee’s Customer- and Fleet-level users. Entering a zero indicates that the password never expires. |
6. Click
the ![]() button (or press [Alt]+S). You will be asked
to confirm. To accept the changes, click the
button (or press [Alt]+S). You will be asked
to confirm. To accept the changes, click the ![]() button (or press [Alt]+O).
button (or press [Alt]+O).
You can
cancel the changes by clicking the ![]() button (or pressing [Alt]+C) any time before
pressing OK.
button (or pressing [Alt]+C) any time before
pressing OK.
Adding a Next ID Licensee Option
1. Select a licensee on the Licensee screen, and navigate to the Licensee Option Values screen in one of the ways described at the beginning of this chapter.
2. Click
the ![]() button (or press [Alt]+A).
button (or press [Alt]+A).
3. Licensee Option Class – Select NEXTID from the list box (mandatory).
4. Licensee
Option Definition – Click the ![]() button to select a definition (mandatory).
button to select a definition (mandatory).
5. Option Value – Enter a custom value for the Licensee Option Definition (mandatory).
|
LICENSEE OPTION DEFINITION |
LICENSEE OPTION VALUE |
|
ADDR_ID_AS400 |
AS/400 ID to be used for the next customer address created (maximum of 7 characters). |
|
CUST_BILL_GRP_ID_AS400 |
AS/400 ID to be used for the next customer bill group created (maximum of 7 characters). |
|
CUST_CARD_GRP_ID_AS400 |
AS/400 ID to be used for the next customer card-sharing group created (maximum of 7 characters). |
|
CUST_DEPT_ID_AS400 |
AS/400 ID to be used for the next customer department created (maximum of 7 characters). |
|
CUST_ID_AS400 |
AS/400 ID to be used for the next customer created (maximum of 7 characters). |
|
CUST_NOTE_ID_AS400 |
AS/400 ID to be used for the next customer note created (maximum of 7 characters). |
|
CUST_VOL_GRP_ID_AS400 |
AS/400 ID to be used for the next customer volume group created (maximum of 7 characters). |
|
EMP_ID_AS400 |
AS/400 ID to be used for the next employee created (maximum of 7 characters). |
|
ISO707649 |
Number to be used for the next Fuelman Plus card issued (maximum of 7 characters). |
|
ISO707685 |
Number to be used for the next Gascard card issued (maximum of 7 characters). |
|
ISO707943 |
Number to be used for the next Sinclair card issued (maximum of 7 characters). |
|
LIC_DIV_ID_AS400 |
AS/400 ID to be used for the next licensee division created (maximum of 2 characters). |
|
MERCH_ID_AS400 |
AS/400 ID to be used for the next merchant created (maximum of 7 characters). |
|
PRE_EMBOSSED_ISO707649 |
Number to be used for the next pre-embossed Fuelman Plus card issued (maximum of 7 characters). |
|
PRE_EMBOSSED_ISO707685 |
Number to be used for the next pre-embossed Gascard card issued (maximum of 7 characters). |
|
PRE_EMBOSSED_ISO707943 |
Number to be used for the next pre-embossed Sinclair card issued (maximum of 7 characters). |
|
VEH_ID_AS400 |
AS/400 ID to be used for the next vehicle created (maximum of 7 characters). |
6. Click the ![]() button (or press [Alt]+S). You will be asked
to confirm. To accept the changes, click the
button (or press [Alt]+S). You will be asked
to confirm. To accept the changes, click the ![]() button (or press [Alt]+O).
button (or press [Alt]+O).
You
can cancel the changes by clicking the ![]() button (or pressing [Alt]+C) any time before
pressing OK.
button (or pressing [Alt]+C) any time before
pressing OK.
Adding a Setup Licensee Option
1. Select a licensee on the Licensee screen, and navigate to the Licensee Option Values screen in one of the ways described at the beginning of this chapter.
2. Click
the ![]() button (or press [Alt]+A).
button (or press [Alt]+A).
3. Licensee Option Class – Select SETUP from the list box (mandatory).
4. Licensee
Option Definition – Click the ![]() button to select a definition (mandatory).
button to select a definition (mandatory).
5. Option Value – Enter a custom value for the Licensee Option Definition (mandatory):
|
LICENSEE OPTION DEFINITION |
LICENSEE OPTION VALUE |
|
CARD_LIC_ID |
Licensee Identifier (maximum of 5 characters) to appear in the card number. |
|
CARD_LIFE_MIN_MONTHS |
Default number of months a card must be unused before it can be terminated. |
|
CARD_LIFE_STD_MONTHS |
Default number of months a card can be active before it must be reissued. |
|
CRDINACMOS |
Default number of months a card is inactive before it stops appearing on card renewal reports. |
|
CRDRNWMOS |
Default number of months before expiration that a card should be renewed. |
|
CSEMAIL |
Return email address to use when sending customer/ merchant emails. A maximum of 50 characters is allowed. |
|
DEPTIDAS400 |
Indicates whether the Department ID AS/400 field can be manually set up for this licensee’s customer departments. “Y” indicates Yes. “N” (the default) indicates No. |
|
ISO |
Indicates the ISO number to be printed on this licensee’s cards. |
|
MERCHEMAIL |
Indicates whether the licensee’s merchants are to be emailed PDF-formatted versions of their MRR800s (Merchant Reimbursement Reports). “Y” indicates Yes. “N” (the default) indicates No. |
|
NYFUELREPORTS |
Indicates whether the licensee wishes to receive the “Y” indicates Yes. (On CMR840, the County Tax Authority totals will be broken out by type of fuel product. In the County Tax Authority section of LMR836, site gasoline and diesel totals will be broken out.) “N” (the default) indicates No. |
6.
Click the ![]() button (or press [Alt]+S). You will be asked
to confirm. To accept the changes, click the
button (or press [Alt]+S). You will be asked
to confirm. To accept the changes, click the ![]() button (or press [Alt]+O).
button (or press [Alt]+O).
You can cancel the changes by clicking the ![]() button (or pressing [Alt]+C) any time before
pressing OK.
button (or pressing [Alt]+C) any time before
pressing OK.
Updating a Licensee Option
1. Select a licensee on the Licensee screen, and navigate to the Licensee Option Values screen in one of the ways described at the beginning of this chapter.
2. On the Licensee Option Values screen, select an option.
3. Click
the ![]() button (or press [Alt]+O).
button (or press [Alt]+O).
4. The Licensee Option and Licensee Definition cannot be changed.
5. Change the Option Value.
6. Click
the ![]() button (or press [Alt]+S). You will be asked
to confirm. To accept the changes, click the
button (or press [Alt]+S). You will be asked
to confirm. To accept the changes, click the ![]() button (or press [Alt]+O).
button (or press [Alt]+O).
You can cancel the changes
by clicking the ![]() button (or pressing [Alt]+C) any time before
pressing OK.
button (or pressing [Alt]+C) any time before
pressing OK.