
Vehicle
The Vehicle screen displays a licensee’s or customer’s vehicles. If you can access more than one licensee, select a licensee (on the Licensee screen) before working with this screen.
The Vehicle screen consists of five tabs:
· Vehicle List displays summary information for one or more vehicles, and allows you to choose a vehicle to work with.
· Vehicle Detail displays more information about a specific vehicle. If you are authorized to do so, you can add or change information on this and the following tabs.
· Vehicle Limits displays limits and other information for a specific vehicle.
· Vehicle Exemptions displays tax exemption information for a specific vehicle.
· Pre-Embossed Cards allows authorized users to assign a pre-embossed card to a vehicle. This tab is visible only if the customer has pre-embossed cards available.
To access the Vehicle screen, do one of the following:
· Select a customer on the full-mode Customer screen, and then select Customer -> View Vehicles from the drop-down menu:
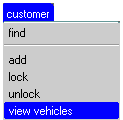
Selecting View Vehicles from the action list has the same effect.
· Select a card on the Card screen and then select Card -> View Vehicles from the drop-down menu. Selecting View Vehicles from the action list has the same effect.
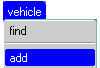
· Select Vehicle -> Find from the drop-down menu:
![]()
This can be slower than the previous two options. You can improve performance by entering search criteria on the Vehicle List tab to narrow the search results.
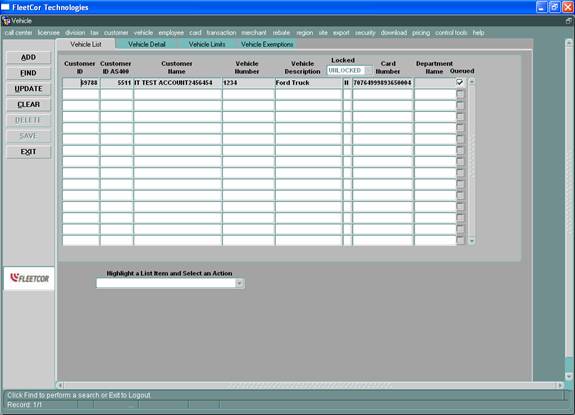
Vehicle List
This tab displays summary information for a specified group of vehicles.
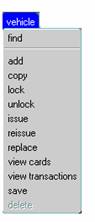
The Vehicle List tab contains an action list:

Each action item performs the following function:
Copy – Copies the selected vehicle to a Vehicle Detail tab, where you can modify it.
Lock – Locks the vehicle record. You must enter a reason on the Vehicle Detail tab.
Unlock – Unlocks the vehicle record and saves the change.
Issue – Issues a card. See Issuing a Card for a Vehicle.
Reissue – Reissues the existing card and
saves the request. See Reissuing
a Card in the Card chapter for more information.
Replace – If this customer has no pre-embossed cards available, this command replaces the existing card and assigns a new card number. See Replacing a Card in the Card chapter.
If this customer does have pre-embossed cards available, you will be offered the choice of a system-assigned card number (same behavior as above) or of a pre-embossed card. Choosing the pre-embossed card option navigates you to the Pre-Embossed Cards tab, where you can select the card.
View Cards – Search for the cards associated with the vehicle on the Card List tab. To view the card’s expiration date, select the card there, and then click on the Card Detail tab.
View Transactions – Search for transactions associated with the vehicle on the Transaction List tab.
Commit Batch – If this customer’s cards are produced by SourceOne, this command sends the Queued cards to SourceOne to be processed.
Note: Before the card order is sent, the Shipping Address window will appear, to allow you to confirm or change the shipping address.
If you are within the Vehicle screens, you can also access most of these actions via the drop-down menu:
Find and Add are the only two vehicle options available until you arrive at the Vehicle List tab.
The tab’s data fields are as follows:
|
DATA FIELD |
DESCRIPTION |
|
Customer ID |
Unique system-assigned identifier of the customer to which the vehicle belongs. |
|
Customer ID AS400 |
Customer’s ID number on the AS/400. |
|
Customer Name |
Customer’s name. |
|
Vehicle Number |
Customer-defined vehicle number. |
|
Vehicle Description |
Customer-defined vehicle description. |
|
Locked |
Lock status of the vehicle (N=Unlocked, Y=Locked). If you have begun a search, you may select a lock status (ALL, LOCKED, or UNLOCKED) from this pulldown. |
|
Card Number |
Seventeen-digit vehicle card number. |
|
Department Name |
Name of the department to which the vehicle is assigned. |
|
Queued |
Indicates whether this card is queued, or has been sent to SourceOne for processing. If when you leave the Vehicle screen, any cards are still Queued, you will receive a reminder message to release the cards for processing. |
The tab’s command button functions are as follows:
|
BUTTON |
DESCRIPTION |
|
Add ([Alt]+A) |
Allows authorized users to
create a new vehicle. |
|
Find ([Alt]+F) |
Allows you to search for a vehicle. See the Getting Started chapter for tips. |
|
Update ([Alt]+U) |
Allows authorized users to update a vehicle. |
|
Clear ([Alt]+C) |
Clears the data fields, but
does not unlock the form. |
|
Delete ([Alt]+D) |
Not in use at this time. |
|
Save ([Alt]+S) |
Saves changes made. You will be asked to confirm the changes. |
|
Exit ([Alt]+X) |
Exits the application. |
Issuing a Card for a Vehicle (If Printed via the AS/400)
1. Navigate to the Vehicle screen in one of the ways described at the beginning of this chapter.
2. Do one of the following:
· Add a vehicle record. See Adding a Vehicle.
· Select a vehicle that has no card assigned. Then select Vehicle -> Issue from the pulldown menu, or select ISSUE from the action list at the bottom of the screen.
3. This step differs, depending on whether this customer has preembossed cards available:
· If this customer does have pre-embossed cards available, you will be offered the choice of a system-assigned card number (see step 4) or of a pre-embossed card. Choosing the pre-embossed card option navigates you to the Pre-Embossed Cards tab, where you can select the card.
· If this customer has no pre-embossed cards available, see step 4.
4.
You will be asked to confirm. Click the ![]() button (or press [Alt]+O) in the confirmation
box. The new card number will populate in the List tab of the screen that you
are using.
button (or press [Alt]+O) in the confirmation
box. The new card number will populate in the List tab of the screen that you
are using.
5. FleetNet saves the request. Cards are then printed using your local AS/400.
Issuing a Pre-Embossed Card to a Vehicle
See Assigning a Pre-Embossed Card to a Vehicle.
Issuing a Card for a Vehicle (If Printed via SourceOne)
1. Navigate to the Vehicle screen in one of the ways described at the beginning of this chapter.
2. Do one of the following:
· Add a vehicle record. See Adding a Vehicle.
· Select a vehicle that has no card assigned. Then select Vehicle -> Issue from the pulldown menu, or select ISSUE from the action list at the bottom of the screen.
3. If this customer’s cards are being printed by SourceOne (if the Licensee’s PLATFORM option is set to SOURCEONE), and if this is the first card you have issued for this customer since you logged in to FleetNet, you will see the screen below. Otherwise, skip to step 4.
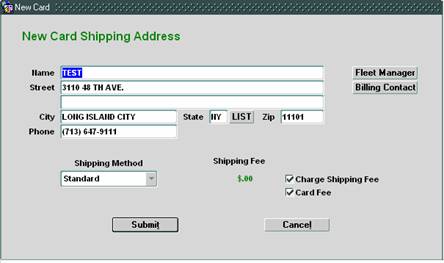
a)
Click the ![]() button to have the cards shipped to the Fleet
Manager. Click the
button to have the cards shipped to the Fleet
Manager. Click the ![]() button to have the cards shipped to the
Billing Contact.
button to have the cards shipped to the
Billing Contact.
b) Select the Shipping Method for this card or batch of cards. The Shipping Fee for that method is then displayed.
c) To charge the Shipping Fee, check the “Charge Shipping Fee” checkbox. Otherwise, leave the box blank. Note: Only one Shipping Fee will be charged for each batch of cards for this customer.
d) To charge the Card Fee set up for the customer, check the “Card Fee” checkbox. Otherwise, leave the box blank.
e) Click
the ![]() button (or press [Alt]+t) to submit this card
request with the information shown. Click the
button (or press [Alt]+t) to submit this card
request with the information shown. Click the ![]() button if you do not wish to issue a card.
button if you do not wish to issue a card.
4.
You will be asked to confirm. Click the ![]() button (or press [Alt]+O) in the confirmation
box.
button (or press [Alt]+O) in the confirmation
box.
The new card number will populate in the List tab of the screen that you are using. In addition, the Queued column will contain a checkmark.
5. To submit the cards marked with a Queued checkmark to SourceOne for processing, select COMMIT BATCH form the action list at the bottom of the screen. Cards are then printed and sent by SourceOne.
Vehicle Detail
This tab displays detailed information about the selected vehicle.
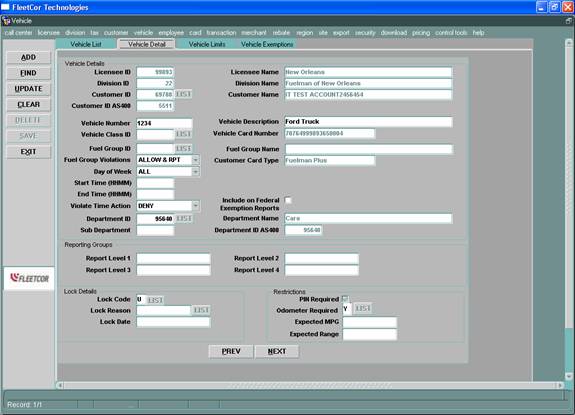
The tab’s data fields are as follows:
|
Vehicle Details DATA FIELD |
DESCRIPTION |
|
Licensee ID |
Licensee to which the vehicle belongs (populated). |
|
Licensee Name |
Name of the licensee to which the vehicle belongs (populated). |
|
Division ID |
ID of the division to which the vehicle belongs (populated). |
|
Division Name |
Licensee-defined name assigned to the division (populated). |
|
Customer ID* |
Unique system-assigned identifier of the customer to which the vehicle belongs. |
|
Customer Name |
Customer’s name (populated). |
|
Customer ID AS400 |
Customer’s ID number on the AS/400 (populated). |
|
Vehicle Number |
Customer-defined number that identifies the vehicle (to 10 alphanumeric characters). |
|
Vehicle Description |
Customer-defined description of the vehicle. |
|
Vehicle Class ID* |
Maintenance intervals that will be reported. |
|
Vehicle Card Number |
Seventeen-digit vehicle card number (populated). |
|
Fuel Group ID* |
Fuel Group (product) to which the vehicle is restricted, if any. A ‘0’ displayed here indicates that all fuel groups are allowed. |
|
Fuel Group Name |
Name of the Fuel Group (product) to which the vehicle is restricted (populated). |
|
Fuel Group Violations |
Indicates how product code (fuel group) violations are handled: DENY, or ALLOW & RPT. If “DENY” is set and a transaction involves the wrong fuel group, the transaction will be denied. If “ALLOW & RPT” is set and a transaction involves the wrong fuel group, the transaction will be approved but flagged as an exception on the Fuel Management report. |
|
Customer Card Type |
Card type in use (populated). |
|
Day of Week |
Days that this vehicle’s card may be used (ALL, MON-FRI, MON-SAT). |
|
Start Time (HHMM) |
If this vehicle’s card may be used only at certain times, this is the beginning time. Note: This is in 24-hour (military) time. For example, 6am would display as 0600. |
|
End Time (HHMM) |
If this vehicle’s card may be used only at certain times, this is the ending time. Note: This is in 24-hour (military) time. For example, 6pm would display as 1800. |
|
Violate Time Action* |
Indicates how day and time violations will be handled: DENY or ALLOW & RPT. This is a mandatory field. If “DENY” is set and a transaction is attempted outside of the specified time period, the transaction will be denied. If “ALLOW & RPT” is set and a transaction is attempted outside of the specified time period, the transaction will be approved but flagged as an exception. |
|
Include on Federal Exemption Reports |
A check indicates that this vehicle should appear on the Customer Federal Excise [gas] Tax Exemption Report (CMR847) or the Customer Federal Diesel Tax Exemption Report (CMR848). These reports are generated during billing. A vehicle will appear on the report only if all of the following are true: · This box is checked. · The vehicle had a transaction during the reporting period. · A tax ID record exists for the customer. (Use the TAXID option of the REPORTS customer option class. See the Customer Option Values chapter.) |
|
Department ID* |
Department number to which the vehicle is assigned. |
|
Department Name |
Name of the department to which the vehicle is assigned (populated). |
|
Sub Department |
Sub-department to which the vehicle is assigned. |
|
Department ID AS400 |
AS/400 ID of the department to which the vehicle belongs. |
|
The first 11 digits of a pre-embossed card. The first 6 digits of the card number (the ISO value) populate based on the value entered in the ISO licensee option (SETUP class) for this Licensee. (See Adding a Setup Licensee Option for more information about the ISO licensee option.) The next 5 digits are the Licensee ID. Enter the remaining 6 digits of a card that you have in your possession. Note: This field appears
only if all of the following are true: ·
This customer’s licensee has an Option
Value of Y for the PREEMBOSS_FLAG licensee option. ·
You have the authority to add vehicles. ·
This vehicle has no card assigned to it. |
Bold = Mandatory field
* = A list of defined values is displayed by clicking the “List” button
|
Lock Details DATA FIELD |
DESCRIPTION |
|
Lock Code* |
Status of the vehicle’s account (U=Unlocked, S=System Locked, M=Manually Locked, N=Notify Franchisee, O=Over Credit Limit, P=Past Due, R=Restricted, E=Expired). |
|
Lock Reason* |
Reason that the vehicle record was locked (Closed, Destroyed, Lost, Stolen, Terminated, Sold). Mandatory if the vehicle record is locked. |
|
Lock Date |
Date on which the card was locked (populated). |
* = A list of defined values is displayed by clicking the “List” button
|
Restrictions DATA FIELD |
DESCRIPTION |
|
PIN Required |
A check indicates that the PIN must be entered at the time of the transaction (default for 1-card Plus). |
|
Odometer Required* |
Indicates whether the odometer reading must be entered at the time of the transaction. Y (Yes) indicates the reading should be entered, but not entering it results in an exception rather than a denial. N (No) indicates that entering the reading is not required. D (Denial) indicates that the reading must be entered, or the transaction will be denied. |
|
Expected MPG |
Vehicle’s expected Miles Per Gallon. |
|
Expected Range |
Number of miles that the vehicle is expected to travel between fuelings (for example, 300 miles). If the driver enters an odometer reading that is out of range (for example, the prior reading plus 500 miles), an exception will be reported on the customer’s exception report. |
Bold = Mandatory field
* = A list of defined values is displayed by clicking the “List” button
Adding a Vehicle
Note: If this Customer is on iFleet, Vehicles can only be added in iFleet.
1. If you can work with more than one licensee, select a licensee on the Licensee screen.
2. Select Vehicle -> Add from the drop-down menu:
3. Licensee ID, Licensee Name, Division ID, Division Name, and Customer Card Type populate with the current licensee’s and customer’s data, and cannot be edited.
4. Customer ID – Select the Customer’s ID number (mandatory). (See the Getting Started chapter if you need help with list boxes).
5. The Customer Name and Customer’s ID AS400 will populate.
6. Vehicle Number – Enter the customer-defined vehicle number (mandatory). A maximum of 10 alphanumeric characters is allowed. Fuel and maintenance reports are sorted first departmentally and then by vehicle number.
7. Vehicle Description – Enter the customer-defined description of the vehicle (mandatory). A maximum of 30 alphanumeric characters is allowed.
8. Vehicle Class ID – Select the Vehicle Class ID (maintenance schedule) to which the vehicle is to be assigned.
9. Fuel Group ID – Select the Fuel Group ID to which the vehicle is restricted, if any. The Fuel Group Name will populate.
Assigning a
vehicle to a Fuel Group prohibits the employee/driver from purchasing any other
type of fuel for the vehicle. To enable a driver to purchase any fuel type,
leave this field blank.
10. Fuel Group Violations – Select a value indicating how product code (fuel group) violations are handled: DENY, or ALLOW & RPT. This is a mandatory field.
If “DENY” is set and a transaction involves the wrong fuel group, the transaction will be denied. If “ALLOW & RPT” is set and a transaction involves the wrong fuel group, the transaction will be approved but flagged as an exception on the Fuel Management report.
11. Day of Week – Select a value indicating which days this vehicle’s card may be used (ALL, MON-FRI, MON-SAT).This is a mandatory field.
12. Start Time (HHMM) – If this vehicle’s card may be used only at certain times, enter the beginning time, in 24-hour (military) format (such as 0600 for 6am).
Note: If this field is blank, the driver may start using the card any time after midnight on the day before.
13. End Time (HHMM) – If this vehicle’s card may be used only at certain times, enter the ending time, in 24-hour (military) format (such as 1800 for 6pm).
Note: If this field is blank, the card can be used until midnight.
14. Violate Time Action – Select a value indicating how day and time violations are handled: DENY, or ALLOW & RPT. This is a mandatory field.
If “DENY” is set and a transaction is attempted outside of the specified time period, the transaction will be denied. If “ALLOW & RPT” is set and a transaction occurs outside of the specified time period, the transaction will be approved but flagged as an exception.
15. Include on Federal Exemption Reports – A checked box indicates that this vehicle should appear on the Customer Federal Excise [gas] Tax Exemption Report (CMR847) or the Customer Federal Diesel Tax Exemption Report (CMR848). A blank box indicates that it should not. This is a mandatory field.
16. Department ID – Select the Department ID to which the vehicle is to be assigned. The Department Name will populate.
17. Sub Department – Enter the Sub-Department to which the vehicle is to be assigned.
18. Existing Card Number – The first 11 digits of a pre-embossed card are shown. To assign a pre-embossed card that has not yet been assigned to the customer, enter the remaining 6 digits of a card that you have in your possession.
Note: This field appears only if all of the following are true:
· This customer’s licensee has an Option Value of Y for the PREEMBOSS_FLAG licensee option.
· You have the authority to add vehicles.
·
This vehicle has no card assigned to it.
19. Report Level 1 – This field, which is used only for National Accounts, reflects a level of reports that can be run. You might enter a Location or Branch number, for example.
20. Report Level 2 – This field, which is used only for National Accounts, reflects a level of reports that can be run. You might enter a District number, for example.
21. Report Level 3 – This field, which is used only for National Accounts, reflects a level of reports that can be run. You might enter a Region number, for example.
22. Report Level 4 – This field, which is used only for National Accounts, reflects a level of reports that can be run. You might enter a Client Code, for example.
23. Lock Code – By default, the Lock Code is U (unlocked). If the vehicle needs to be locked, select the applicable lock code. The Lock Date field will populate with the current date and time.
24. Lock Reason – If you lock a vehicle, you must select a Lock Reason. Press [Enter] or [Tab].
25. PIN Required – A check indicates that the driver must enter a PIN at the time of the transaction. A blank box indicates that the PIN is not needed. This is a mandatory field.
26. Odometer Required – Indicate whether the vehicle’s odometer reading is required at the time of the transaction:
· Y indicates that if the reading is not entered, the transaction will appear on an exception report, but will not be denied for this reason.
· N indicates that the reading is not required.
· D indicates that the reading must be entered or the transaction will be denied.
27. Expected MPG – Enter the Miles Per Gallon (to 3 decimal places) that the vehicle is expected to get. Use this field for a customer who receives a weekly exception report.
28.
Expected Range – Enter the number of miles that
the vehicle is expected to travel between fuelings. For example, if the
Setting a range for a vehicle might cause some
transactions to be reported as exceptions unnecessarily, causing the customer
extra research to determine if there is a problem. For example, if
a driver is traveling a long distance and has to fuel outside the network, they
must report the offsite fueling to the
You will be navigated to the Vehicle Limits tab to complete the vehicle entry after pressing [Enter] or [Tab].
Note: Pressing Save after completing the
Updating a Vehicle
1. Navigate to the Vehicle screen in one of the ways described at the beginning of this chapter.
2. Retrieve and select the vehicle you wish to update.
3.
Click the ![]() button (or double-click the vehicle record).
button (or double-click the vehicle record).
4. Click the Vehicle Detail tab.
5. Licensee ID, Licensee Name, Division ID, Division Name, Customer ID, Customer ID AS400 and Customer Card Type cannot be changed.
6. Vehicle Number – Optionally, change the vehicle number. Fuel and maintenance reports are sorted first departmentally and then by vehicle number.
7. Vehicle Description – Optionally, change the description of the vehicle.
Note: If this customer is on iFleet, this field can only be changed in iFleet.
8. Vehicle Class ID – Optionally, change the Vehicle Class ID (maintenance schedule) to which the vehicle is to be assigned.
9. The Vehicle Card Number cannot be changed using the Update button. Change it using the Replace function (See Vehicle List for information on accessing that command).
If the vehicle has no card assigned to it, under certain circumstances you can assign a pre-embossed card to it on the Vehicle Detail tab. See step 18 of Adding a Vehicle, above.
10. Fuel Group ID – Optionally, change the Fuel Group ID to which the vehicle is restricted (if any). The Fuel Group Name will change accordingly.
Assigning a
vehicle to a Fuel Group prohibits the employee/driver from purchasing any other
type of fuel for the vehicle. To enable a driver to purchase any fuel type,
leave this field blank.
Note: If this customer is on iFleet, this field can only be changed in iFleet.
11. Fuel Group Violations – Optionally, select a different method of handling product code (fuel group) violations.
If “DENY” is set and a transaction involves the wrong fuel group, the transaction will be denied. If “ALLOW & RPT” is set and a transaction involves the wrong fuel group, the transaction will be approved but flagged as an exception on the Fuel Management report.
12. Day of Week – Optionally, change the days that this vehicle’s card may be used.
Note: If this customer is on iFleet, this field can only be changed in iFleet.
13. Start Time (HHMM) – If this vehicle’s card may be used only at certain times, enter the beginning time, in 24-hour (military) format (such as 0600 for 6am).
Note: If this field is blank, the driver may start using the card any time after midnight on the day before.
14. End Time (HHMM) – If this vehicle’s card may be used only at certain times, enter the ending time, in 24-hour (military) format (such as 1800 for 6pm).
Note: If this field is blank, the card can be used until midnight.
15. Violate Time Action – Optionally, select a different method of handling day and time violations.
If “DENY” is set and a transaction is attempted outside of the specified time period, the transaction will be denied. If “ALLOW & RPT” is set and a transaction occurs outside of the specified time period, the transaction will be approved but flagged as an exception.
16. Include on Federal Exemption Reports – A checked box indicates that this vehicle should appear on the Customer Federal Excise [gas] Tax Exemption Report (CMR847) or the Customer Federal Diesel Tax Exemption Report (CMR848). A blank box indicates that it should not.
17. Department ID – Optionally, change the department to which the vehicle is assigned. The Department Name will change accordingly.
18. Sub Department – Optionally, change the Sub-Department to which the vehicle is assigned.
19. Lock Code – By default, the Lock Code is U (unlocked). If the vehicle needs to be locked, select the applicable lock code. The Lock Date field will populate with the current date and time.
20. Lock Reason – If you lock a vehicle, you must select a Lock Reason.
21. PIN Required – A check indicates that the driver must enter a PIN at the time of the transaction. A blank box indicates that the PIN is not needed.
22. Odometer Required – Optionally, change the requirement for entering an odometer reading at the time of the transaction:
· Y indicates that if the reading is not entered, the transaction will appear on an exception report, but will not be denied for this reason.
· N indicates that the reading is not required.
· D indicates that the reading must be entered or the transaction will be denied.
23. Expected MPG – Optionally, change the Miles Per Gallon (to 3 decimal places) that the vehicle is expected to get. Use this field for a customer who receives a weekly exception report.
24.
Expected Range – Optionally, change the number
of miles that the vehicle is expected to travel between fuelings. For example,
if the
Setting a range for a vehicle might cause some
transactions to be reported as exceptions unnecessarily, causing the customer
extra research to determine if there is a problem. For example, if
a driver is traveling a long distance and has to fuel outside the network, they
must report the offsite fueling to the
25. If necessary, make changes in the Vehicle Limits or Vehicle Exemptions tabs.
26.
Click the ![]() button (or press [Alt]+S). You will be asked
to confirm. Click the
button (or press [Alt]+S). You will be asked
to confirm. Click the ![]() button (or press [Alt]+O) to accept the
changes.
button (or press [Alt]+O) to accept the
changes.
You can
cancel the changes by clicking the ![]() button (or pressing [Alt]+C) any time before
pressing OK.
button (or pressing [Alt]+C) any time before
pressing OK.
Vehicle Limits
This tab displays limits and usage totals for a particular vehicle, as well as transaction history.
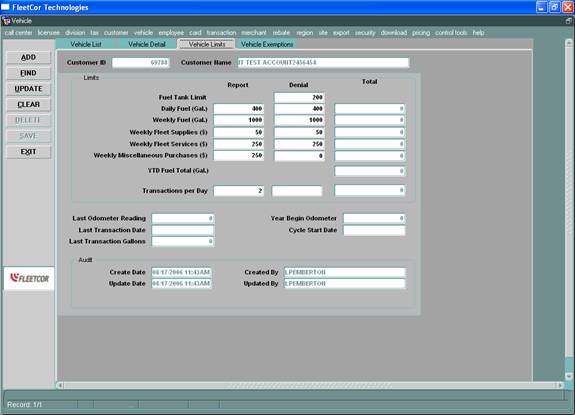
The tab’s data fields are as
follows:
|
DATA FIELD |
DESCRIPTION |
|
Customer ID |
Unique system-assigned identifier of the customer to which the vehicle belongs (populated). |
|
Customer Name |
Customer’s name (populated). |
|
Limits DATA FIELD |
DESCRIPTION |
|
Fuel Tank Limit – Denial |
If a fuel transaction exceeds this gallon amount, the transaction will be denied. Default = 200. |
|
Daily Fuel (Gal.) – Report |
Gallons that can be purchased for the vehicle in a 24-hour period (midnight-midnight) before the vehicle’s subsequent fuel transactions are flagged as an exception. Default = 400. |
|
Daily Fuel (Gal.) –
Denial |
Gallons that can be purchased for the vehicle in a 24-hour period before the vehicle’s subsequent fuel transactions are denied. Default = 400. |
|
Daily Fuel (Gal.) – Total |
Gallons that have been purchased for the vehicle that day (populated). |
|
Fuel (Gal.) –
Report |
Maximum gallons of fuel that can be purchased during the customer’s authorization cycle (Weekly or Monthly, as appropriate) before the vehicle’s subsequent fuel transactions are flagged as an exception. Default = 1000. |
|
Fuel (Gal.) –
Denial |
Maximum gallons of fuel that can be purchased during the customer’s authorization cycle before the vehicle’s subsequent fuel transactions are denied. Default = 1000. |
|
Fuel (Gal.) – Total |
Gallons purchased for the vehicle in the customer’s current authorization cycle (populated). |
|
Fleet Supplies ($)
– Report |
Dollar amount of Supplies that can be purchased during the
customer’s authorization cycle (Weekly or Monthly, as appropriate) before the
vehicle’s subsequent oil transactions are flagged as an exception. Default
= 50. Note: This limit was previously called “Oil”. |
|
Fleet Supplies ($)
– Denial |
Dollar amount of Supplies that can be purchased during the customer’s authorization cycle before the vehicle’s subsequent Supplies transactions are denied. Default = 50. |
|
Fleet Supplies ($) – Total |
Dollar amount of Supplies that has been purchased for the vehicle during the customer’s current authorization cycle (populated). |
|
Fleet Services ($)
– Report |
Dollar amount of Services that can be purchased during the
customer’s authorization cycle (Weekly or Monthly, as appropriate) before the
vehicle’s subsequent Services transactions are flagged as an exception. Default
= 250. Note: This limit was previously called “TBA” (Tires, Batteries & Accessories). |
|
Fleet Services ($)
– Denial |
Dollar amount of Services that can be purchased during the customer’s authorization cycle before the vehicle’s subsequent Services transactions are denied. Default = 250. |
|
Fleet Services ($) – Total |
Dollar amount of Services that has been purchased for the vehicle during the customer’s current authorization cycle (populated). |
|
Miscellaneous
Purchases ($) – Report |
Dollar amount of miscellaneous Purchases that can be made during the customer’s authorization cycle (Weekly or Monthly, as appropriate) before the vehicle’s subsequent Miscellaneous transactions are flagged as an exception. Default = 250. Note: This limit was previously called “Miscellaneous”. |
|
Miscellaneous
Purchases ($) – Denial |
Dollar amount of miscellaneous Purchases that can be made during the customer’s authorization cycle before the vehicle’s subsequent Miscellaneous transactions are denied. Default = 0. |
|
Miscellaneous Purchases ($) – Total |
Dollar amount of miscellaneous Purchases made for the vehicle during the customer’s current authorization cycle (populated). |
|
YTD Fuel Total (Gal.) |
Gallons that have been purchased for the vehicle in the current year (populated). |
|
Transactions per
Day – Report |
Number of transactions allowed for the vehicle in a 24-hour period (midnight-midnight) before subsequent transactions are flagged as an exception. Default = 2. Note: If a null (blank) is entered, no transactions will be flagged as exceptions for exceeding a Transactions-Per-Day limit. |
|
Transactions per Day – Denial |
Number of transactions allowed for the vehicle in a 24-hour period (midnight-midnight) before subsequent transactions are denied. Default = [null]. (No transactions will be denied for exceeding a Transactions-Per-Day limit). |
|
Transactions per Day – Total |
Number of transactions recorded for the vehicle in the current 24-hour period (populated). |
Bold = Mandatory field
|
DATA FIELD |
DESCRIPTION |
|
Last Odometer |
Vehicle’s last recorded odometer reading (populated). |
|
Year Begin Odometer |
Odometer reading at the time of the vehicle’s first fueling of the year (populated). |
|
Last Transaction Date |
Date of the vehicle’s last recorded transaction (populated). |
|
Cycle Start Date |
Start date of the billing cycle. |
|
Last Transaction Gallons |
Number of gallons purchased in the vehicle’s most recent transaction (populated). |
|
Audit DATA FIELD |
DESCRIPTION |
|
Create Date |
Date and time that the vehicle record was created. |
|
Created By |
User Name of the person who created the vehicle. |
|
Update Date |
Date and time that the vehicle was last updated. |
|
Updated By |
User who made the most recent update to the vehicle. |
The tab’s command button functions are as follows:
|
BUTTON |
DESCRIPTION |
|
Add ([Alt]+A) |
Allows authorized users to
create a new vehicle. |
|
Find ([Alt]+F) |
Allows you to search for a vehicle. |
|
Update ([Alt]+U) |
Allows authorized users to update a vehicle. |
|
Clear ([Alt]+C) |
Clears the data fields, but
does not unlock the form. |
|
Delete ([Alt]+D) |
Not in use at this time. |
|
Save ([Alt]+S) |
Saves changes made. You will be asked to confirm the changes. |
|
Exit ([Alt]+X) |
Exits the application. |
Updating or Setting Vehicle Limits
If you are a Licensee level user who frequently changes the defaults, you might want to create your own default settings for all of your fleets. See Adding a Default Values Licensee Option in the Licensee Option Values chapter for details.
Note: If this customer is on iFleet, the limits can only be changed in iFleet.
1. Navigate to the Vehicle screen in one of the ways described at the beginning of this chapter.
2. Retrieve and select the vehicle you wish to update.
3.
Click the ![]() button (or press [Alt]+U).
button (or press [Alt]+U).
4. Click on the Vehicle Limits tab.
5. Fuel Tank Limit – Denial – Optionally, change the denial limit for number of gallons that can be purchased in one fueling. This is a mandatory field.
6. Daily Fuel (Gal.) – Report – Optionally, change the report limit for daily gallons purchased. This is a mandatory field.
7. Daily Fuel (Gal.) – Denial – Optionally, change the denial limit for daily gallons purchased. This is a mandatory field.
8. Fuel (Gal.) – Report – Optionally, change the report limit for gallons purchased in an authorization cycle. This is a mandatory field.
9. Fuel (Gal.) – Denial – Optionally, change the denial limit for gallons purchased in an authorization cycle. This is a mandatory field.
10. Fleet Supplies – Report – Optionally, change the report limit for Supplies purchased in an authorization cycle. This is a mandatory field.
11. Fleet Supplies – Denial – Optionally, change the denial limit for Supplies purchased in an authorization cycle. This is a mandatory field.
12. Fleet Services – Report – Optionally, change the report limit for Services purchased in an authorization cycle. This is a mandatory field.
13. Fleet Services – Denial – Optionally, change the denial limit for Services purchased in an authorization cycle. This is a mandatory field.
14. Miscellaneous Purchases – Report – Optionally, change the report limit for Miscellaneous Purchases in an authorization cycle. This is a mandatory field.
15. Miscellaneous Purchases – Denial – Optionally, change the denial limit for Miscellaneous Purchases in an authorization cycle. This is a mandatory field.
16. Transactions per Day – Report – Optionally, change the report limit for Transactions per Day. This is a mandatory field.
17. Transactions per Day – Denial – Optionally, change the denial limit for Transactions per Day. This is a mandatory field.
18. Cycle Start Date – Optionally, enter or change the start date of the billing cycle.
19.
Click the ![]() button (or press [Alt]+S). You will be asked
to confirm. Click the
button (or press [Alt]+S). You will be asked
to confirm. Click the ![]() button (or press [Alt]+O) to accept the
changes.
button (or press [Alt]+O) to accept the
changes.
When you save a new vehicle record without entering an existing card number (see step 18 of Adding a Vehicle), you will be asked if you want to issue a card. See Issuing a Card for a Vehicle (If Printed via the AS/400) and Issuing a Card for a Vehicle (If Printed via SourceOne) regarding issuing a card to the new vehicle.
You can
cancel the changes by clicking the ![]() button (or pressing [Alt]+C) any time before
pressing OK.
button (or pressing [Alt]+C) any time before
pressing OK.
Vehicle Exemptions
This tab displays tax exemption information for a specific vehicle.
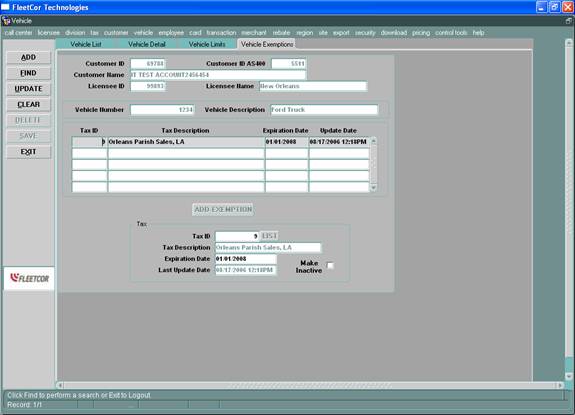
The tab’s data fields are as
follows:
|
DATA FIELD |
DESCRIPTION |
|
Customer ID |
Unique system-assigned
identifier of the customer to which the vehicle belongs (populated). |
|
Customer ID AS400 |
Customer’s ID number on the
AS/400 (populated). |
|
Customer Name |
Customer’s name
(populated). |
|
Licensee ID |
Licensee to which the
vehicle belongs (populated). |
|
Licensee Name |
Name of the licensee to which the vehicle belongs
(populated). |
|
DATA FIELD |
DESCRIPTION |
|
Vehicle Number |
Customer-defined number
that identifies the vehicle (populated). |
|
Vehicle Description |
Customer-defined vehicle description (populated). |
|
DATA FIELD |
DESCRIPTION |
|
Tax ID |
System-generated number
that is unique to each tax code. |
|
Tax Description |
Description of the tax
code. |
|
Expiration Date |
Date the exemption expires. |
|
Update Date |
Date and time that the exemption was last updated
(populated). |
|
Tax ID |
System-generated number that is unique to each tax code. |
|
Tax Description |
Description of the tax code. |
|
Expiration Date |
Date the exemption expires. |
|
Last Update Date |
Date and time that the
exemption was last updated (populated). |
|
Make Inactive |
Check indicates that this exemption is not active. |
Bold = Mandatory field
The tab’s command button functions are as follows:
|
BUTTON |
DESCRIPTION |
|
Add ([Alt]+A) |
Not in use at this time. |
|
Find ([Alt]+F) |
Not in use at this time. |
|
Update ([Alt]+U) |
Allows authorized users to update a vehicle. |
|
Clear ([Alt]+C) |
Clears the data fields, but
does not unlock the form. |
|
Delete ([Alt]+D) |
Not in use at this time. |
|
Save ([Alt]+S) |
Saves changes made. You will be asked to confirm the changes. |
|
Exit ([Alt]+X) |
Exits the application. |
Adding a Vehicle Tax Exemption
1. Navigate to the Vehicle screen in one of the ways described at the beginning of this chapter.
2. Retrieve and select the vehicle you wish to update.
3.
Click the ![]() button (or press [Alt]+U).
button (or press [Alt]+U).
4. Click the Vehicle Exemptions tab.
5.
Click the ![]() button.
button.
6. Tax ID – Select the ID of the tax from which this vehicle is exempt (mandatory). The Tax Description field will populate.
If you don’t see the Tax ID you are looking for, contact System Support.
7. Expiration Date – Enter the expiration date of the exemption, in MM/DD/YYYY format (mandatory). This date should be on your exemption certificate.
8.
Click the ![]() button (or press [Alt]+S). You will be asked
to confirm. Click the
button (or press [Alt]+S). You will be asked
to confirm. Click the ![]() button (or press [Alt]+O) to save the
exemption.
button (or press [Alt]+O) to save the
exemption.
Once you’ve applied the tax exemption(s) to the vehicle, you can flag the customer to receive the optional “Customer Tax Exempt Report” (CMR846). (See the Customer Options chapter.)
You can
cancel the changes by clicking the ![]() button (or pressing [Alt]+C) any time before
pressing OK.
button (or pressing [Alt]+C) any time before
pressing OK.
Updating a Vehicle Tax Exemption
1. Navigate to the Vehicle screen in one of the ways described at the beginning of this chapter.
2. Retrieve and select the vehicle you wish to update.
3. Click the Vehicle Exemptions tab.
4.
Click the ![]() button.
button.
5. In the tax exemptions box, select the exemption you would like to change.
6. Only the Expiration Date and Make Inactive fields can be edited. In the Tax box, change the Expiration Date or Make Inactive flag.
7.
Click the ![]() button (or press [Alt]+S). You will be asked
to confirm. Click the
button (or press [Alt]+S). You will be asked
to confirm. Click the ![]() button (or press [Alt]+O) to save the
exemption.
button (or press [Alt]+O) to save the
exemption.
You can cancel the
changes by clicking the ![]() button (or pressing [Alt]+C) any time before
pressing OK.
button (or pressing [Alt]+C) any time before
pressing OK.
Pre-Embossed Cards
This tab allows authorized users to assign a pre-embossed card to a vehicle. It is visible only if the Customer has pre-embossed cards available.

When you have chosen the card number, click the ![]() button. If you decide
not to assign a pre-embossed card to this vehicle, click the
button. If you decide
not to assign a pre-embossed card to this vehicle, click the ![]() button.
button.
The tab’s data fields are as follows:
|
DATA FIELD |
DESCRIPTION |
|
Customer ID |
Unique system-assigned identifier of the customer to which this vehicle belongs (populated). |
|
Customer ID AS400 |
Unique system-assigned identifier (on the AS/400) of the customer to which this vehicle belongs (populated). |
|
Customer Name |
Name of the customer to which this vehicle belongs (populated). |
|
Licensee ID |
Licensee to which the customer belongs (populated). |
|
Licensee Name |
Name of the licensee to which the customer belongs (populated). |
|
Vehicle DATA FIELD |
DESCRIPTION |
|
Vehicle Number |
Customer-defined number
that identifies the vehicle (populated). |
|
Vehicle Description |
Customer-defined vehicle
description (populated). |
|
Vehicle Card Number* |
Number of the pre-embossed card to be assigned to the vehicle. |
Bold = Mandatory field
* = A list of defined values is displayed by clicking
the “List” button
The tab’s command button
functions are as follows:
|
BUTTON |
DESCRIPTION |
|
Add ([Alt]+A) |
Not in use on this tab. |
|
Find ([Alt]+F) |
Not in use on this tab. |
|
Update ([Alt]+U) |
Not in use on this tab. |
|
Clear ([Alt]+C) |
Clears the data fields, but
does not unlock the form. |
|
Delete ([Alt]+D) |
Not in use at this time. |
|
Save ([Alt]+S) |
Not in use on this tab. |
|
Exit ([Alt]+X) |
Exits the application. |
Assigning a Pre-Embossed Card to a Vehicle
1. Navigate to the Vehicle screen in one of the ways described at the beginning of this chapter.
2. Find and retrieve the vehicle to which you will assign a pre-embossed card.
3. This step differs, depending on whether the vehicle already has a card assigned to it:
· If the vehicle has no card assigned to it, select ISSUE from the action list at the bottom of the Vehicle List tab (or select Vehicle -> Issue from the drop-down menu). If the customer has no pre-embossed cards available, you will be returned to the Vehicle screen. You can repeat the process and choose a system assigned card, or you must request additional pre-embossed cards for this customer.
· If the vehicle does have a card assigned to it, select REPLACE instead of ISSUE. Then proceed as above.
4. Customer ID, Customer ID AS400, and Licensee ID cannot be changed. Customer Name can be changed only on the Details tab of the Customer screen. Licensee Name can only be changed on the Licensee Detail tab of the Licensee screen. Vehicle Number and Vehicle Description can be changed only on the Vehicle Detail tab of the Vehicle screen.
5.
Vehicle Card Number
– Click the ![]() button to view the available pre-embossed
cards for this customer. Select a card number from the list window (mandatory).
button to view the available pre-embossed
cards for this customer. Select a card number from the list window (mandatory).
If you decide not to
assign a pre-embossed card to this vehicle, click the ![]() button.
button.
6.
Click the ![]() button. You will
receive a confirmation message. Click the
button. You will
receive a confirmation message. Click the ![]() button to acknowledge the message.
button to acknowledge the message.
You can clear the entire
form by clicking the ![]() button (or pressing [Alt]+C) any time before
pressing OK.
button (or pressing [Alt]+C) any time before
pressing OK.